Configuring Notifications
iOS Push Notifications
Getting started
To set up push notifications, you need to complete the following steps:
- Make sure you have completed all of the required steps in this guide
- Turn on push notifications in your project's settings
- Set the push notifications on the client side.
Enabling the Push Notification Service
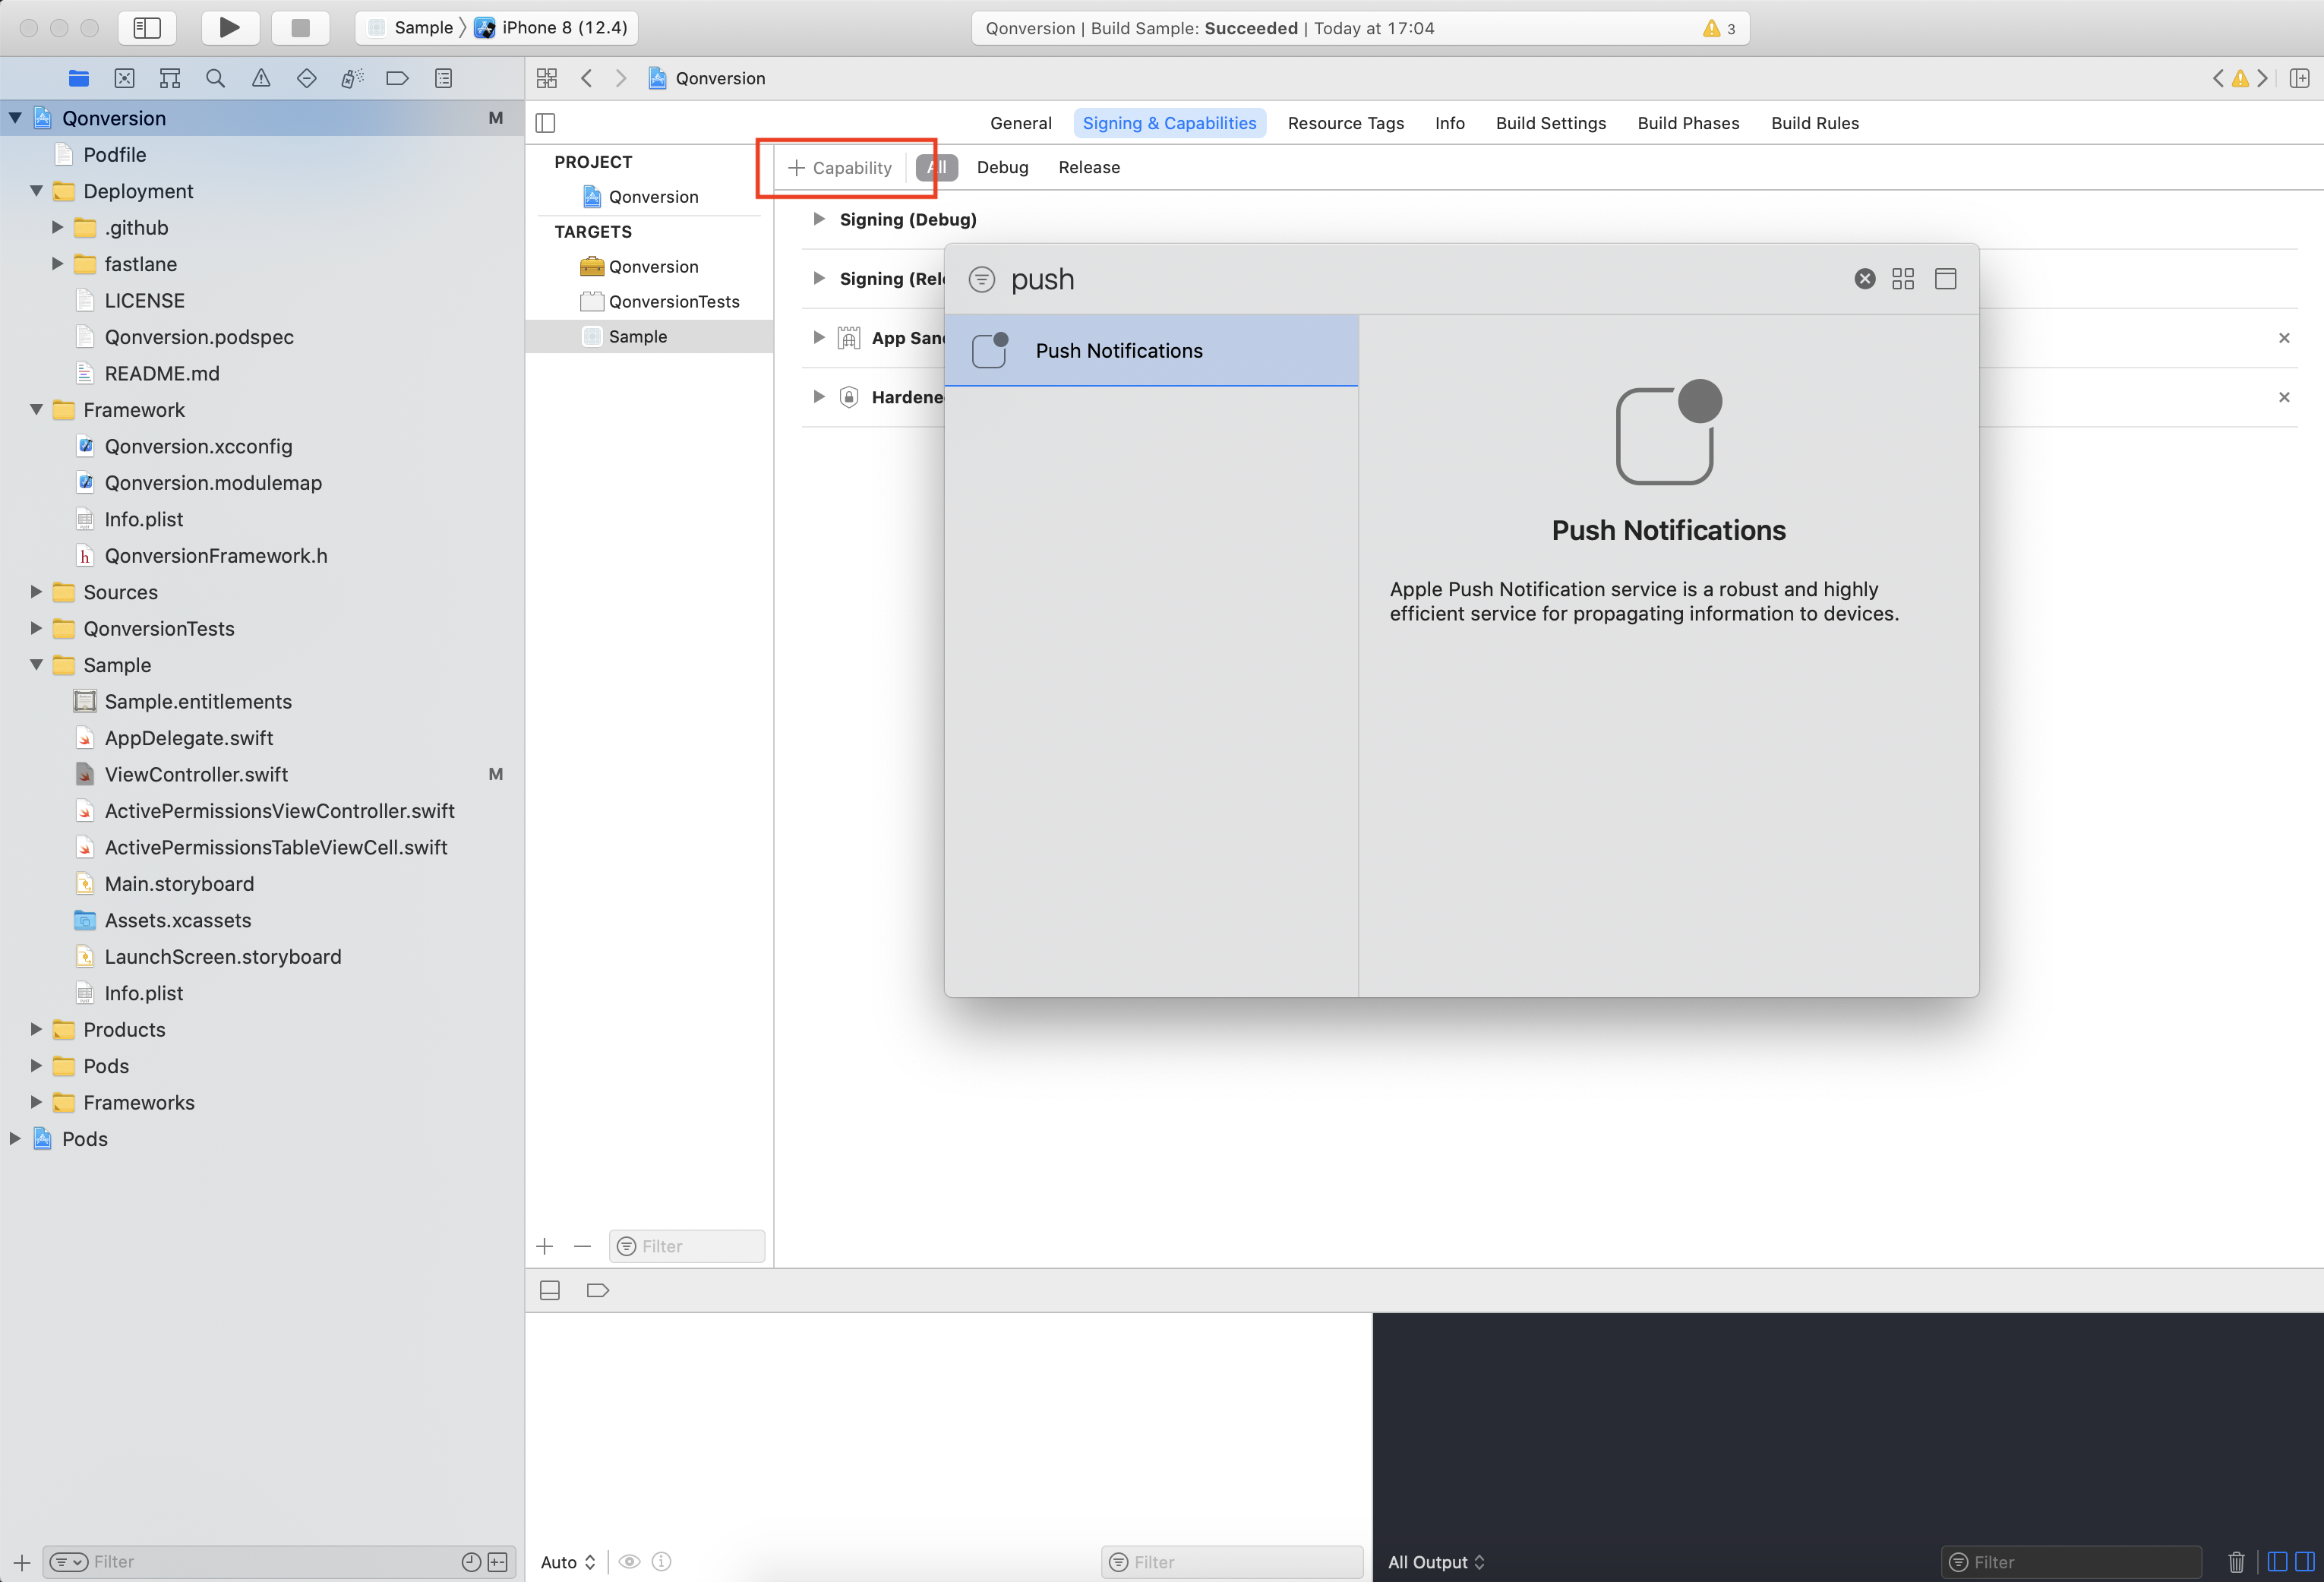
- Select your app target
- Click the Signing & Capabilities tab
- Click the + Capability button.
- Type “push notifications” in the filter field
- Press Enter

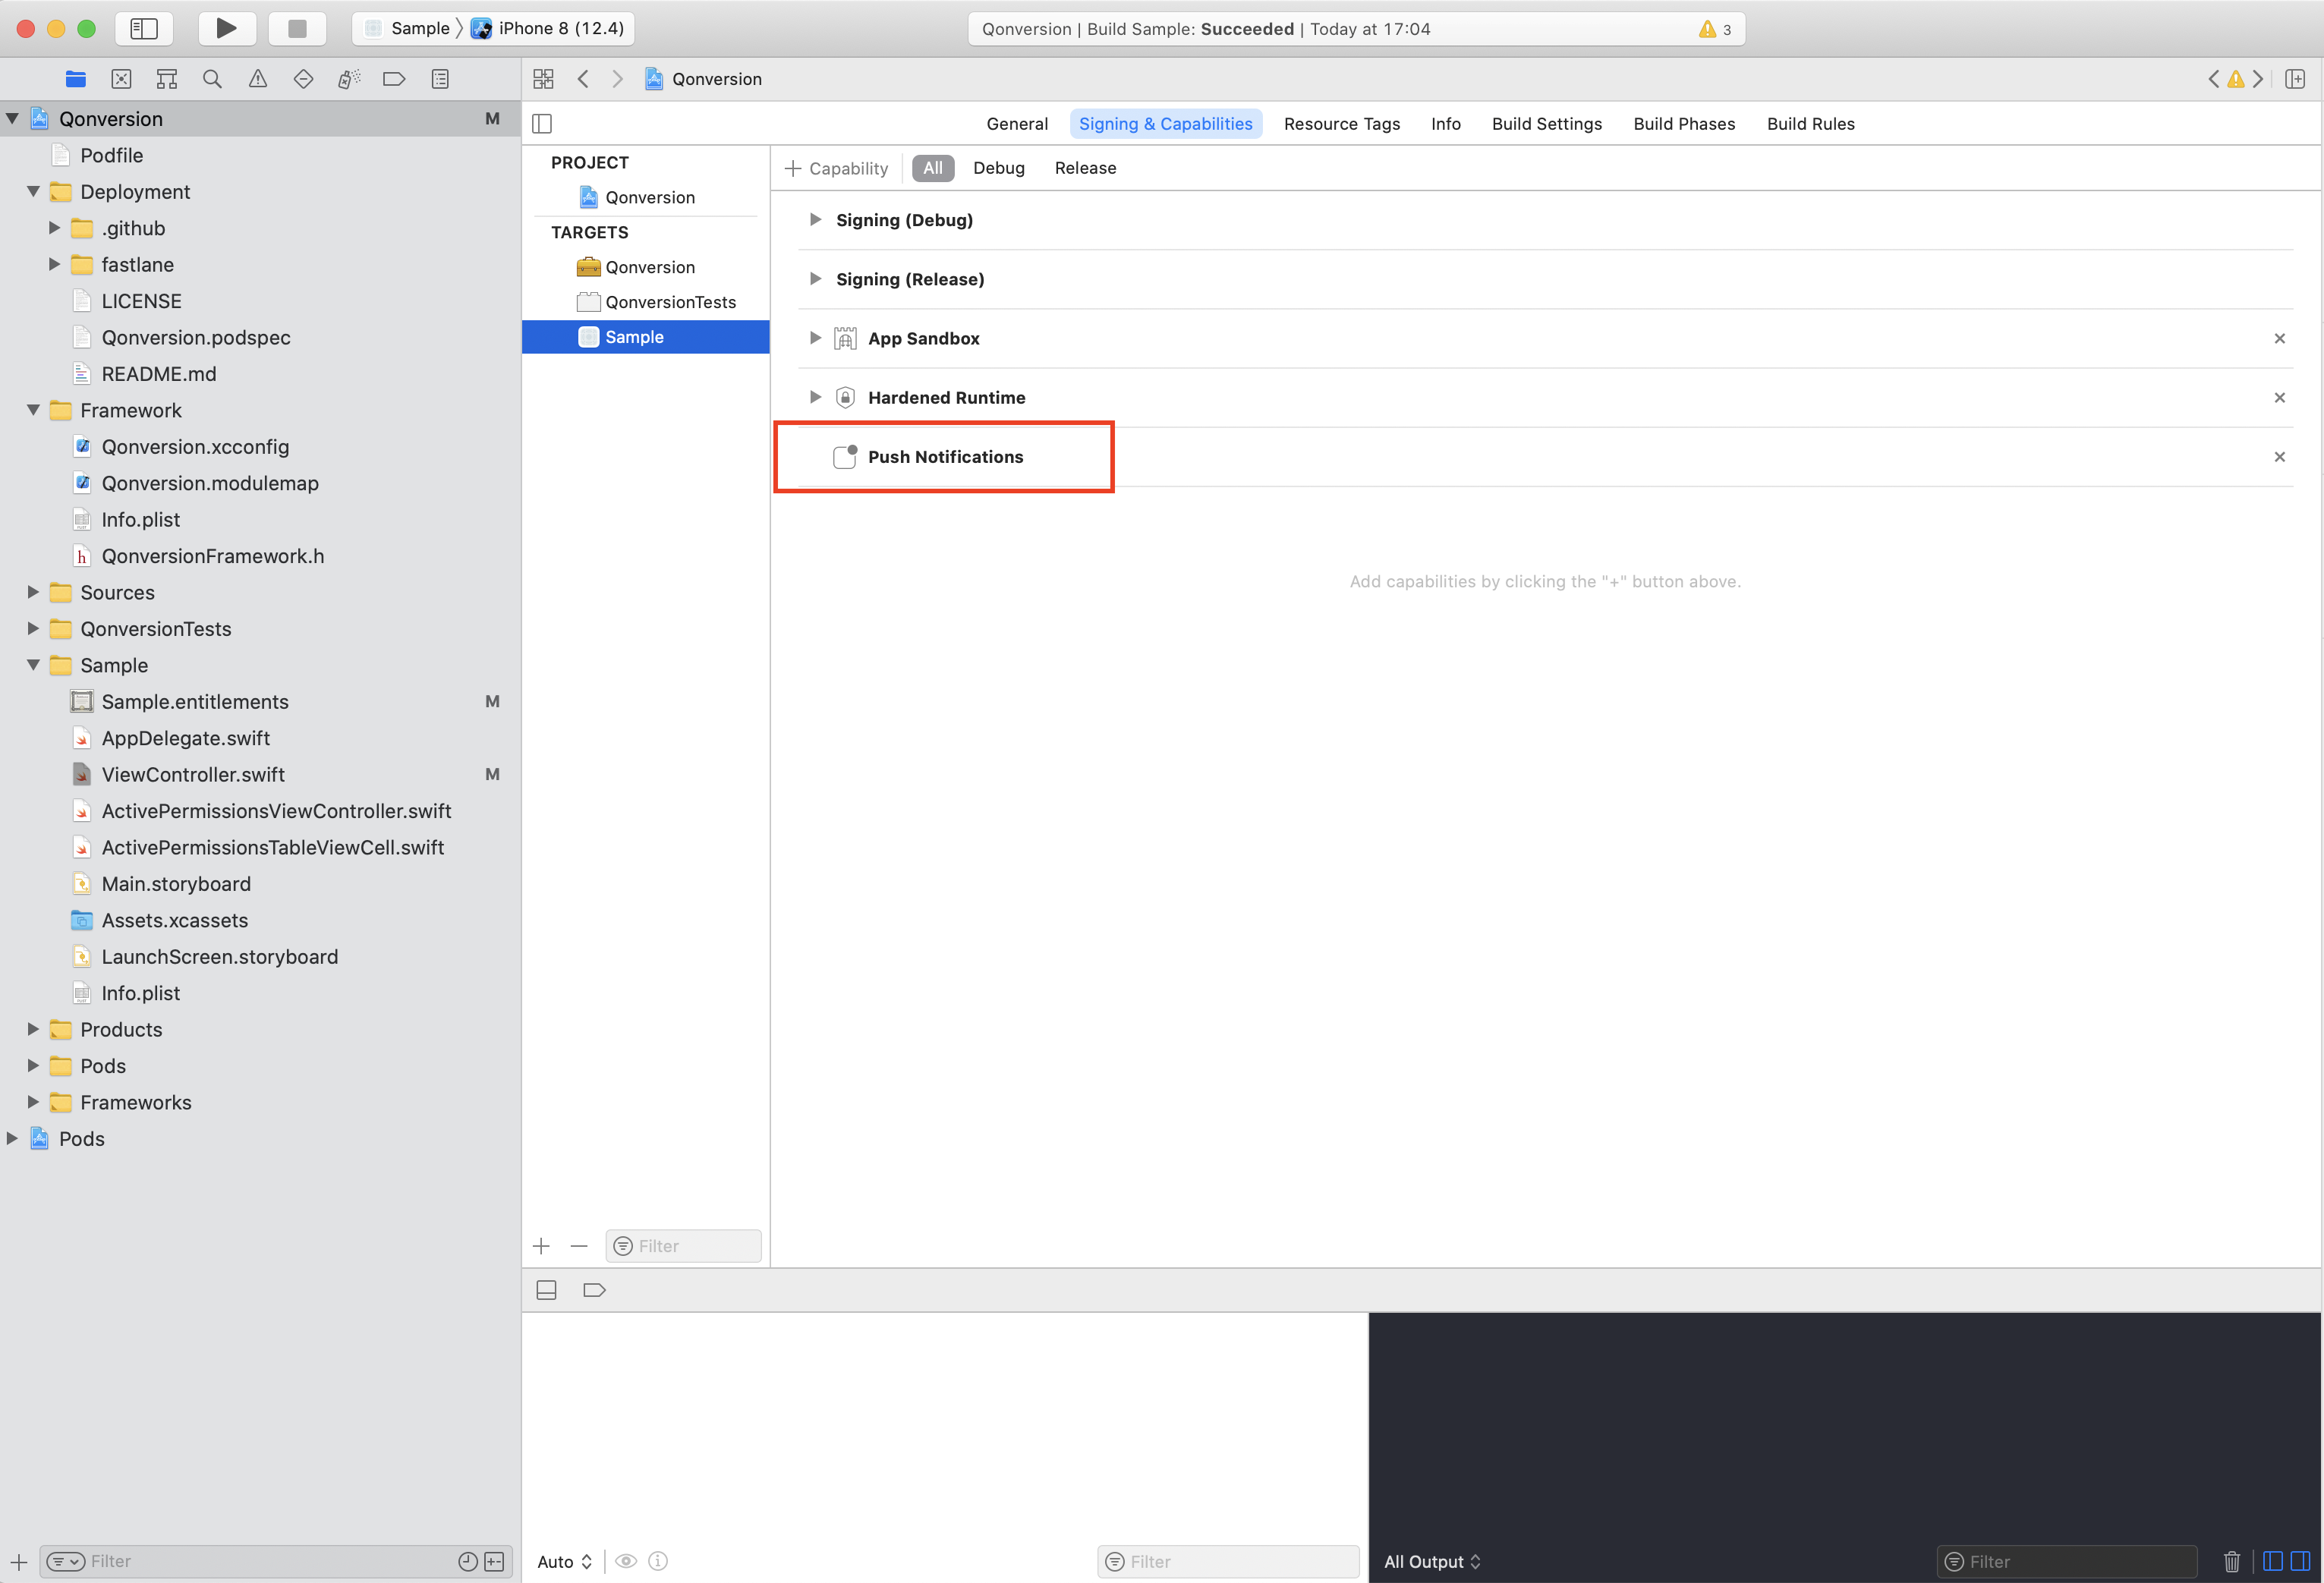
After adding the push notifications entitlement, your project should look like this:

Asking for User Notifications Permission
There are two steps to register for push notifications:
- Get the user’s permission to show notifications
- Register the device to receive remote notifications
Open your AppDelegate and add the following import:
import UserNotifications#import <UserNotifications/UserNotifications.h>Then, add the following method:
func registerForNotifications() {
    // Set delegate to handle push notification further
    UNUserNotificationCenter.current().delegate = self

    // Get the user’s permission to show notifications
    UNUserNotificationCenter.current().requestAuthorization(options: [.alert, .sound, .badge]) { granted, _ in
        guard granted else { return }

        UNUserNotificationCenter.current().getNotificationSettings { settings in
            guard settings.authorizationStatus == .authorized else { return }

            DispatchQueue.main.async {
                // Register the device to receive remote notifications
                UIApplication.shared.registerForRemoteNotifications()
            }
        }
    }
}
- (void)registerForNotifications {
// Set delegate to handle push notification further
[UNUserNotificationCenter currentNotificationCenter].delegate = self;
// Get the user’s permission to show notifications
UNNotificationPresentationOptions options = UNNotificationPresentationOptionSound | UNNotificationPresentationOptionBadge | UNNotificationPresentationOptionAlert;
[[UNUserNotificationCenter currentNotificationCenter] requestAuthorizationWithOptions:options completionHandler:^(BOOL granted, NSError * _Nullable error) {
if (!granted) {
return;
}
[[UNUserNotificationCenter currentNotificationCenter] getNotificationSettingsWithCompletionHandler:^(UNNotificationSettings * _Nonnull settings) {
if (settings.authorizationStatus != UNAuthorizationStatusAuthorized) {
return;
}
dispatch_async(dispatch_get_main_queue(), ^{
// Register the device to receive remote notifications
[[UIApplication sharedApplication] registerForRemoteNotifications];
});
}];
}];
}Call this method in application(_:didFinishLaunchingWithOptions:)
Add this line just before return:
registerForNotifications()[self registerForNotifications];Handling push notifications
You AppDelegate need to use UNUserNotificationCenterDelegate to receive a push notification.
This class was already assigned as UNUserNotificationCenter delegate above.
Add the following code for Swift or extend the class in the case of Objective-C:
extension AppDelegate: UNUserNotificationCenterDelegate {

}
@interface AppDelegate() <UNUserNotificationCenterDelegate>Now you have to implement the following functions:
Handling push notifications interaction
Use a following function to handle user tapping on the push notification
func userNotificationCenter(_ center: UNUserNotificationCenter, didReceive response: UNNotificationResponse, withCompletionHandler completionHandler: @escaping () -> Void) {
    completionHandler()
}
- (void)userNotificationCenter:(UNUserNotificationCenter *)center didReceiveNotificationResponse:(UNNotificationResponse *)response withCompletionHandler:(void (^)(void))completionHandler {
completionHandler();
}Handling push notifications in foreground
In case you need your app to show a push notification in foreground, add this function:
func userNotificationCenter(_ center: UNUserNotificationCenter, willPresent notification: UNNotification, withCompletionHandler completionHandler: @escaping (UNNotificationPresentationOptions) -> Void) {
    completionHandler([.alert, .badge, .sound])
}
- (void)userNotificationCenter:(UNUserNotificationCenter *)center willPresentNotification:(UNNotification *)notification withCompletionHandler:(void (^)(UNNotificationPresentationOptions))completionHandler {
UNNotificationPresentationOptions options = UNNotificationPresentationOptionSound | UNNotificationPresentationOptionBadge | UNNotificationPresentationOptionAlert;
completionHandler(options);
}Your App is configured for working with push notifications now.
Let's prepare notifications for Qonversion Automations
Android Push Notifications
Notification types
Firebase Cloud Messaging offers two message types: data messages and notification messages. Qonversion uses data messages to send push notifications on Android. This allows handling notifications in the foreground and background app states and defining what happens upon notifications being pressed.
Handling push notifications
1 Create a notification channel
You have to register your app's notification channel in the system to deliver notifications on Android 8.0 and higher.
2 Create a service
Create a service that extends FirebaseMessagingService to receive and handle notifications from Firebase.
AndroidManifest.xmlDon't forget to include YourFirebaseMessagingService in the manifest file.
3 Create and show notifications
Override the onMessageReceived() method to create and show notifications. Provide the channel id, set the notification content you want and finally show the notification with NotificationManagerCompat.notify().
The code below is just an example for displaying a notification. You can edit it according to your needs. You can also check the official Android push notifications documentation.
@Override
public void onMessageReceived(RemoteMessage remoteMessage) {
    super.onMessageReceived(remoteMessage);

    String title = remoteMessage.getData().get("title");
    String body = remoteMessage.getData().get("body");

    NotificationCompat.Builder notificationBuilder = new NotificationCompat.Builder(this, CHANNEL_ID)
            .setContentTitle(title)
            .setContentText(body)
      		.setSmallIcon(R.drawable.ic_notification);

    NotificationManagerCompat notificationManager = NotificationManagerCompat.from(this);
    // For notificationId use any unique value you want to be an ID for the notification.
    notificationManager.notify(notificationId, notificationBuilder.build());
}
override fun onMessageReceived(remoteMessage: RemoteMessage) {
super.onMessageReceived(remoteMessage)
val title = remoteMessage.data["title"]
val body = remoteMessage.data["body"]
// Create a notification
val notificationBuilder = NotificationCompat.Builder(this, CHANNEL_ID)
.setContentTitle(title)
.setContentText(body)
.setSmallIcon(R.drawable.ic_notification)
with(NotificationManagerCompat.from(this)) {
// For notificationId use any unique value you want to be an ID for the notification.
notify(notificationId, notificationBuilder.build())
}
}Cross-platform Push Notifications
Cross-platform frameworks provide various solutions for implementing push notifications. The concrete implementation depends on the solution you choose for your product. Thus we can not provide any code examples here. Please, visit corresponding tutorials for your cross-platform framework.
Updated 10 months ago
