1. Open the Google Cloud Console
- Sign in to the Google Cloud Console.
- Pick the Google Cloud project that owns your app from the project picker at the top (or create one).
- From Quick access on the welcome page, open APIs & Services — this is where you enable the integrations Qonversion needs.

Project picker (1) and APIs & Services tile (2) on the Google Cloud welcome page
2. Enable the required Google APIs
Enable these two APIs in the Google Cloud project that contains your service account:- Google Play Android Developer API — lets Qonversion validate purchases and read subscription state.
- Cloud Pub/Sub API — lets Qonversion create the topic and subscription used for Real-Time Developer Notifications (RTDN).
2.1 Open the API Library
In APIs & Services, click Library in the left sidebar.
APIs & Services → Library
2.2 Find each API
Search by name (e.g.Google Play Android Developer API) and open the matching result. Repeat for the other API.

Search the API Library by name and open the result tile
2.3 Enable each API
On every Product details page, click Enable. You’ll repeat this for both APIs.
Enable Google Play Android Developer API and Cloud Pub/Sub API in turn
3. Create a service account
The service account is the identity Qonversion uses to call Google APIs on your behalf.3.1 Open IAM & Admin
Return to the Cloud Console home (or use the search bar) and open IAM & Admin from Quick access.
Open IAM & Admin from Quick access
3.2 Start the service account form
In the left sidebar, click Service Accounts, then + Create service account at the top.
Service Accounts → Create service account
3.3 Name the service account
Give it a clear name likeQonversion. The Service account ID auto-fills from the name. Click Create and continue to move on.

Name the service account, then Create and continue
3.4 Grant the required roles
In the Permissions step, grant Pub/Sub Admin to the service account in this Cloud project, then click Done. Qonversion uses it to create the RTDN topic and subscription and grant Google Play permission to publish to the topic. Leave the optional Principals step empty. If you monitor Pub/Sub in Google Cloud, grant Cloud Monitoring access separately.4. Generate a JSON key
The JSON key is the credential Qonversion stores to authenticate as your service account.4.1 Open the Keys tab and add a key
Open the service account you just created, switch to the Keys tab, click Add key, then Create new key.
Service account → Keys → Add key → Create new key
4.2 Choose JSON and create
Pick JSON (the recommended format) and click Create. The browser downloads the key file — save it somewhere safe.
Choose JSON and click Create
5. Copy the service account’s email
You’ll need this email in a moment to invite the service account into Google Play Console. In the Service Accounts list, click the email address (or its copy icon) — it looks like<name>@<project-id>.iam.gserviceaccount.com.

Copy the service account email from the Service Accounts list
6. Grant the service account access in Google Play Console
The service account exists in Google Cloud, but Google Play Console manages permissions separately — you need to invite it there too.6.1 Open Users and permissions
In Google Play Console, open Users and permissions from the left sidebar and click Invite new users.
Users and permissions → Invite new users
6.2 Paste the email and add your app under App permissions
Paste the service account email you copied in section 5 into Email address, then open the App permissions tab and add the app you’re configuring.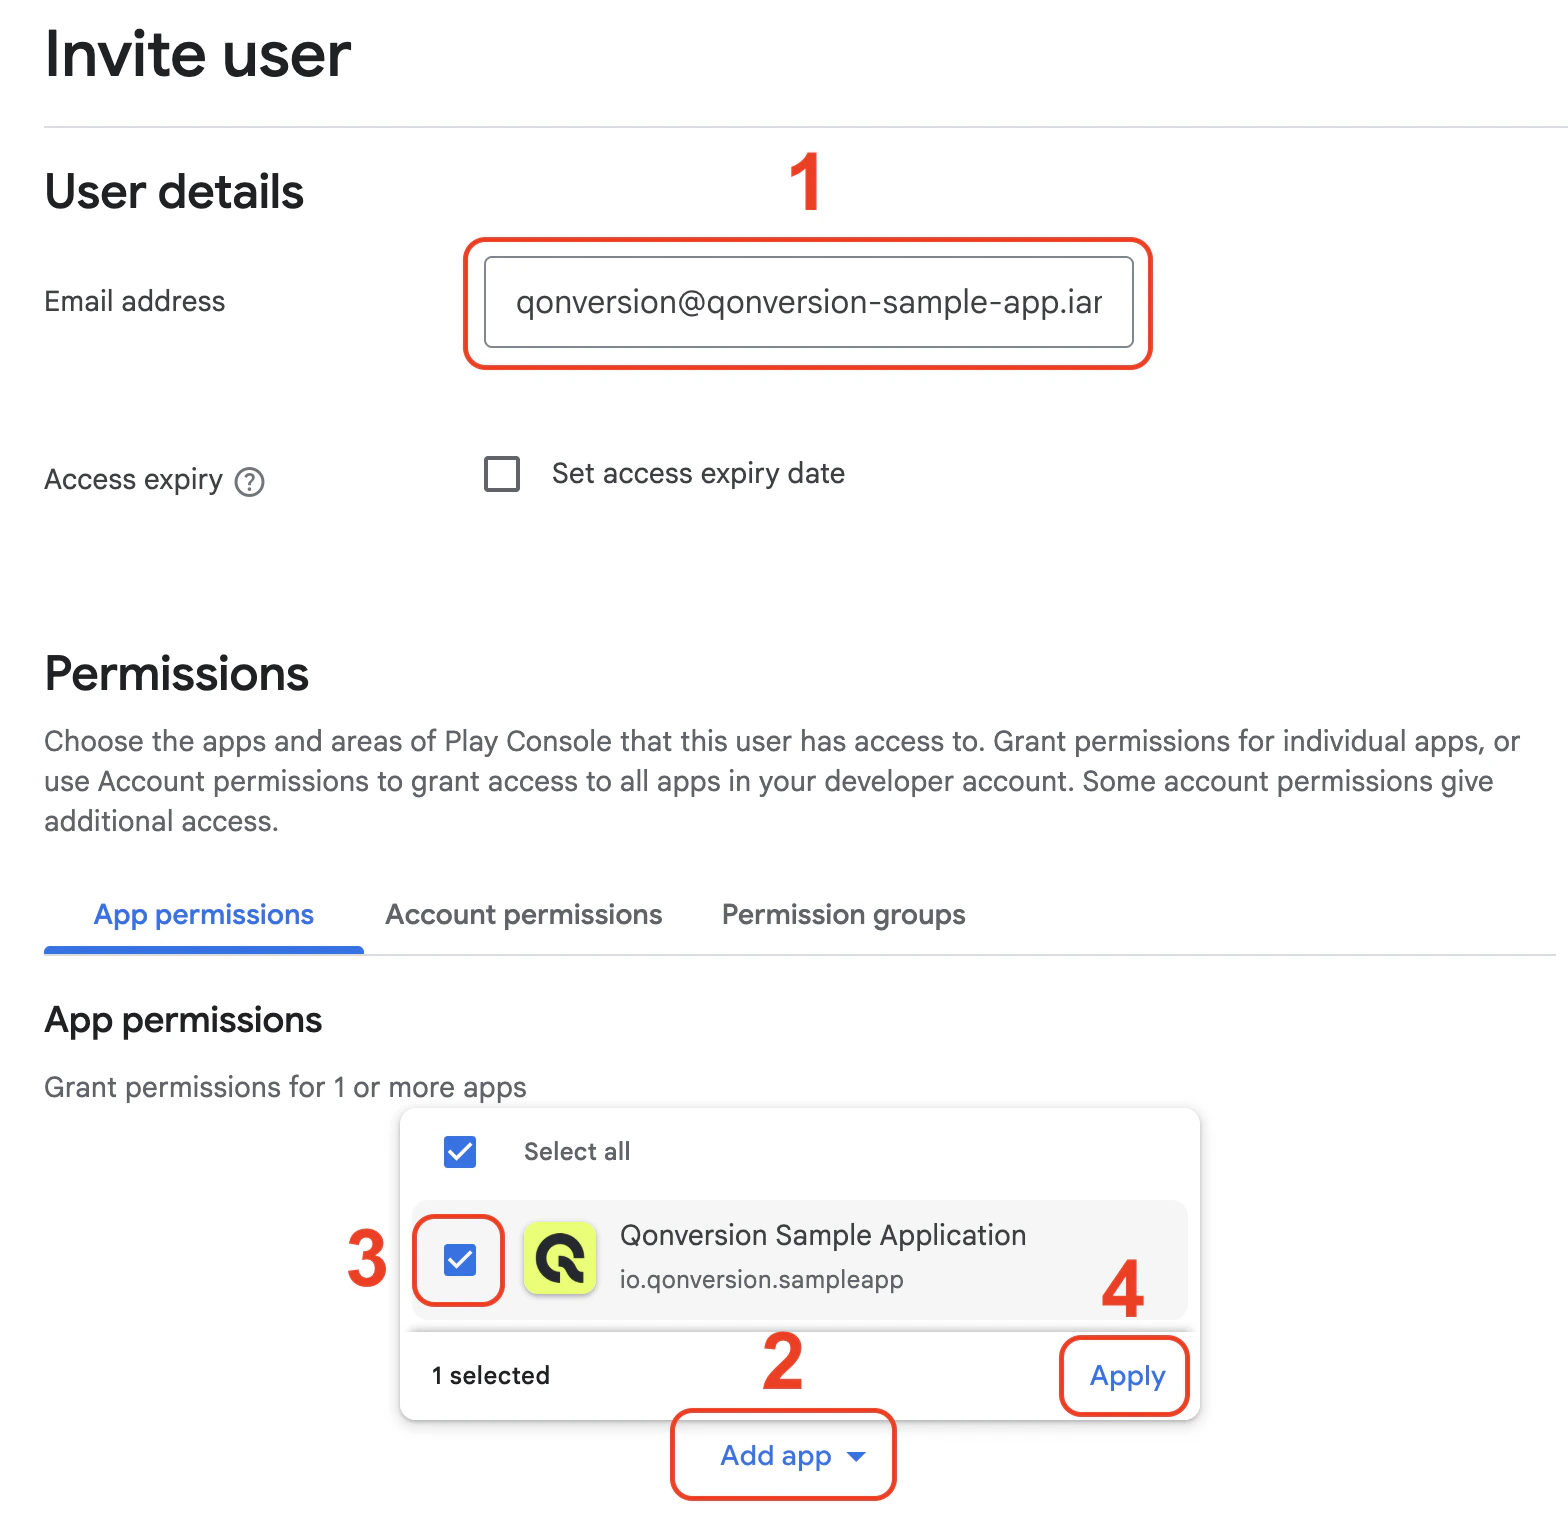
Paste the email (1), open the App permissions tab (2), select your app (3), and Apply (4)
6.3 Switch to Account permissions and grant access
Open the Account permissions tab, tick these three checkboxes, then click Invite user:- View app information and download bulk reports (read-only)
- View financial data, orders, and cancellation survey responses
- Manage orders and subscriptions
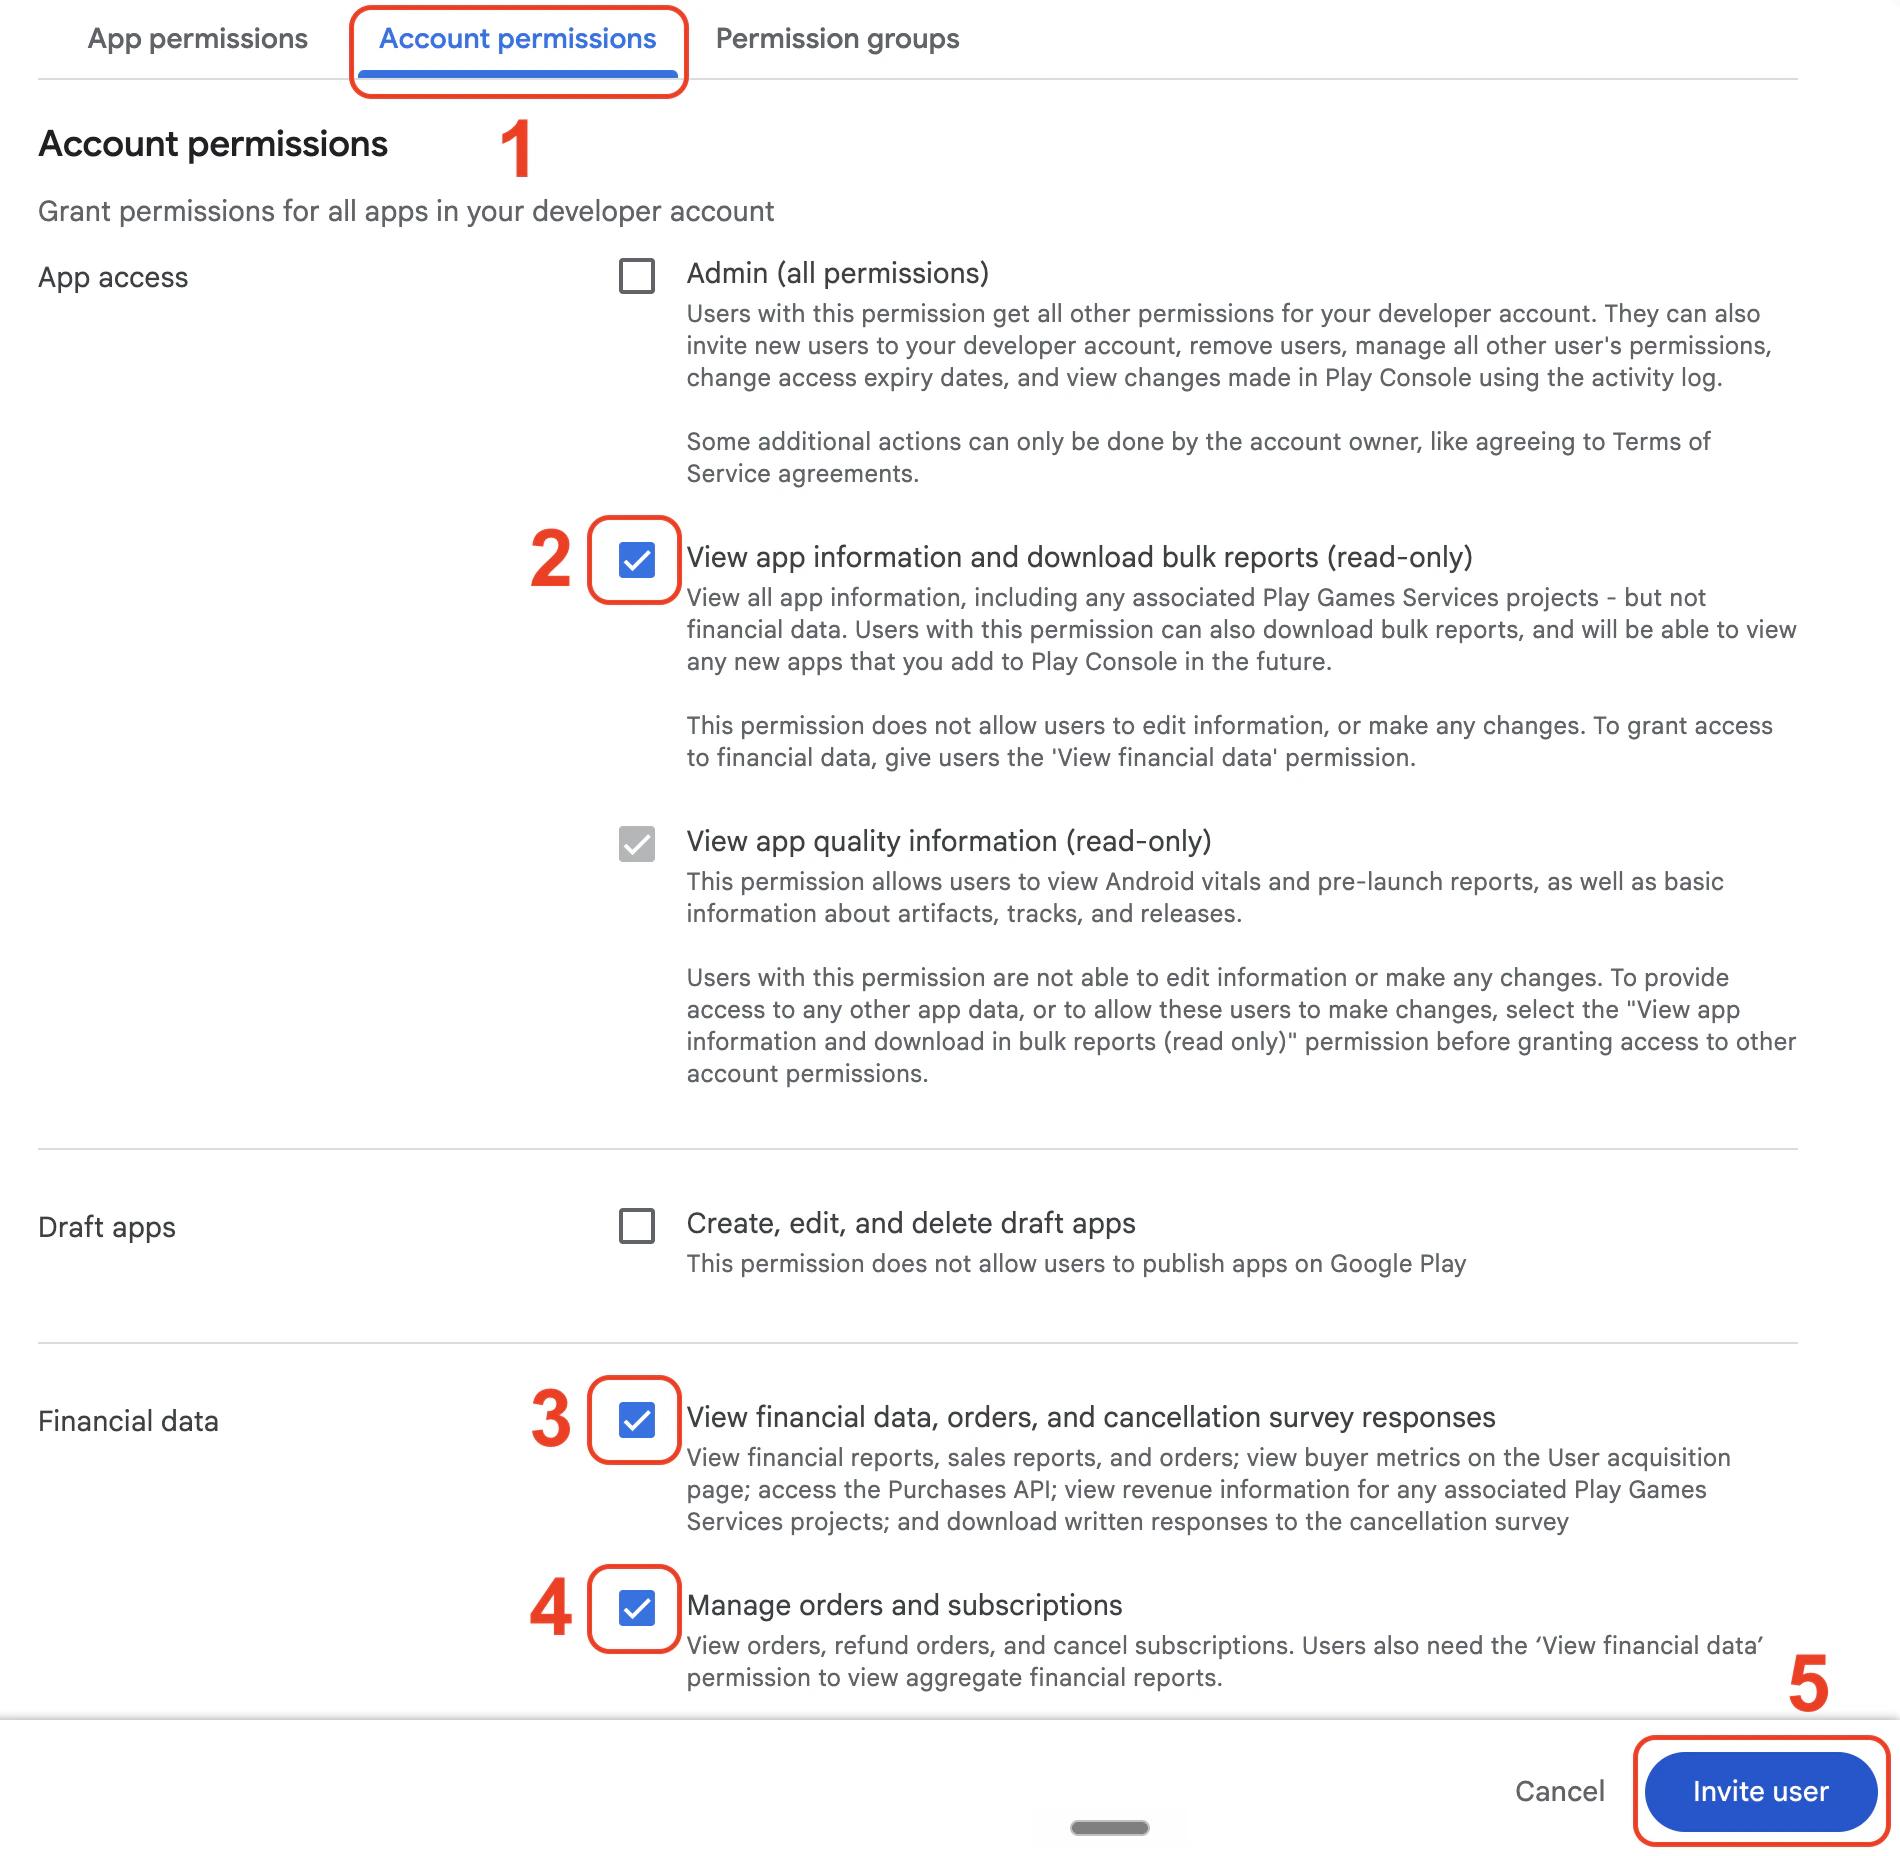
Account permissions tab (1) → three required permissions (2, 3, 4) → Invite user (5)
7. Paste everything into Qonversion
Now jump back to Qonversion Dash → Project Settings → Stores → Google Play Console.-
Paste your Android Package Name. This is the same value as
applicationIdin your app-levelbuild.gradle— and the identifier Google Play Console lists against each app on the Home screen of your developer account.
Your Android Package Name = applicationId in build.gradle = the identifier shown for your app in Google Play Console
-
Open Service account key and upload the
.jsonfile you downloaded in section 4. - Click Save & verify. The saved key shows Verified when Google accepts it. Full access means the key can also read your products for product sync; Limited access means it cannot.
- Under Real-time notifications (RTDN), check for a Pub/Sub topic. If none is shown, open Google Play store setup for the same project and click Connect to Google. Return to Real-time notifications (RTDN) and copy the topic.
- Paste the topic in Google Play Console → Monetization setup → Real-time developer notifications. See Google Developer Notifications for the Play Console step.
Troubleshooting
”Please provide valid JSON credentials”
- Wait up to 24 hours after granting Play Console access — propagation is slow.
- Make sure the service account is invited in both Google Cloud (as a service account) and Google Play Console (as a user with the three required Account permissions plus the app under App permissions).
- Confirm the JSON file’s
client_emailmatches the service-account email you invited.
”The current user has insufficient permissions”
If you created your in-app products before granting the service account access, Google Play sometimes caches the old permission set. Open any in-app product on the Google Play Console, edit it lightly (e.g. tweak the description) and save — that nudges the cache.Real-time notifications show “Not receiving”
- Use Send Test Notification in Google Play Console to test notification delivery, or trigger a sandbox subscription event.
- Confirm that the topic name in Google Play Console matches the topic shown in Qonversion.
- Check that
google-play-developer-notifications@system.gserviceaccount.comhas Pub/Sub Publisher on that topic. Qonversion grants this permission when it creates the topic. - Qonversion creates the topic with your service account; confirm it has Pub/Sub Admin in its Google Cloud project.
- Check that Cloud Pub/Sub API is enabled in the same Google Cloud project.
Lost the .json key
If the current key is already saved in Qonversion and working, no action is needed. Otherwise, create a new key in Service Accounts → Keys, then follow the replacement steps above before deleting the old key.What’s next?
After this step, your Android configuration is complete. Test end-to-end:- Make a sandbox purchase from a test device and confirm it appears in Qonversion within seconds.
- Trigger a refund or cancellation in Play Console and confirm the event arrives.