> ## Documentation Index
> Fetch the complete documentation index at: https://documentation.qonversion.io/llms.txt
> Use this file to discover all available pages before exploring further.
# Google Play Service Account Key
> Google Play Service Account Key
You need to provide the Play Store service account key to [your Qonversion project settings](https://dash.qonversion.io/project/stores) so that we can verify your in-app purchases. Qonversion provides out-of-the-box in-app subscription infrastructure. Learn more about [Qonversion](https://qonversion.io) and [sign up](https://dash.qonversion.io/site/signup?utm_source=docs\&utm_medium=docs\&utm_campaign=servicekey) for free.
Service accounts provide access to the Google Play Developer Publishing API on behalf of an application rather than an end user. Service accounts are suitable for accessing the API from an unattended server, such as an automated build server (e.g. Jenkins). All actions will be shown as originating from the service account. You can edit permissions for the service account on the ‘User Accounts & Rights’ page.
## 1. Enable Google APIs in the Google Cloud Console
1. Go to the [Google Cloud Console](https://console.cloud.google.com/welcome).
2. Select your project from the projects list or create a new one.
3. Go to the [API & Services tab](https://console.cloud.google.com/apis/dashboard) and click the "Enable API and Services" button.  4. In the [API Library tab](https://console.cloud.google.com/apis/library), search for the [Google Play Developer Reporting API](https://console.cloud.google.com/apis/library/playdeveloperreporting.googleapis.com).
  5. Enable the API for your project.
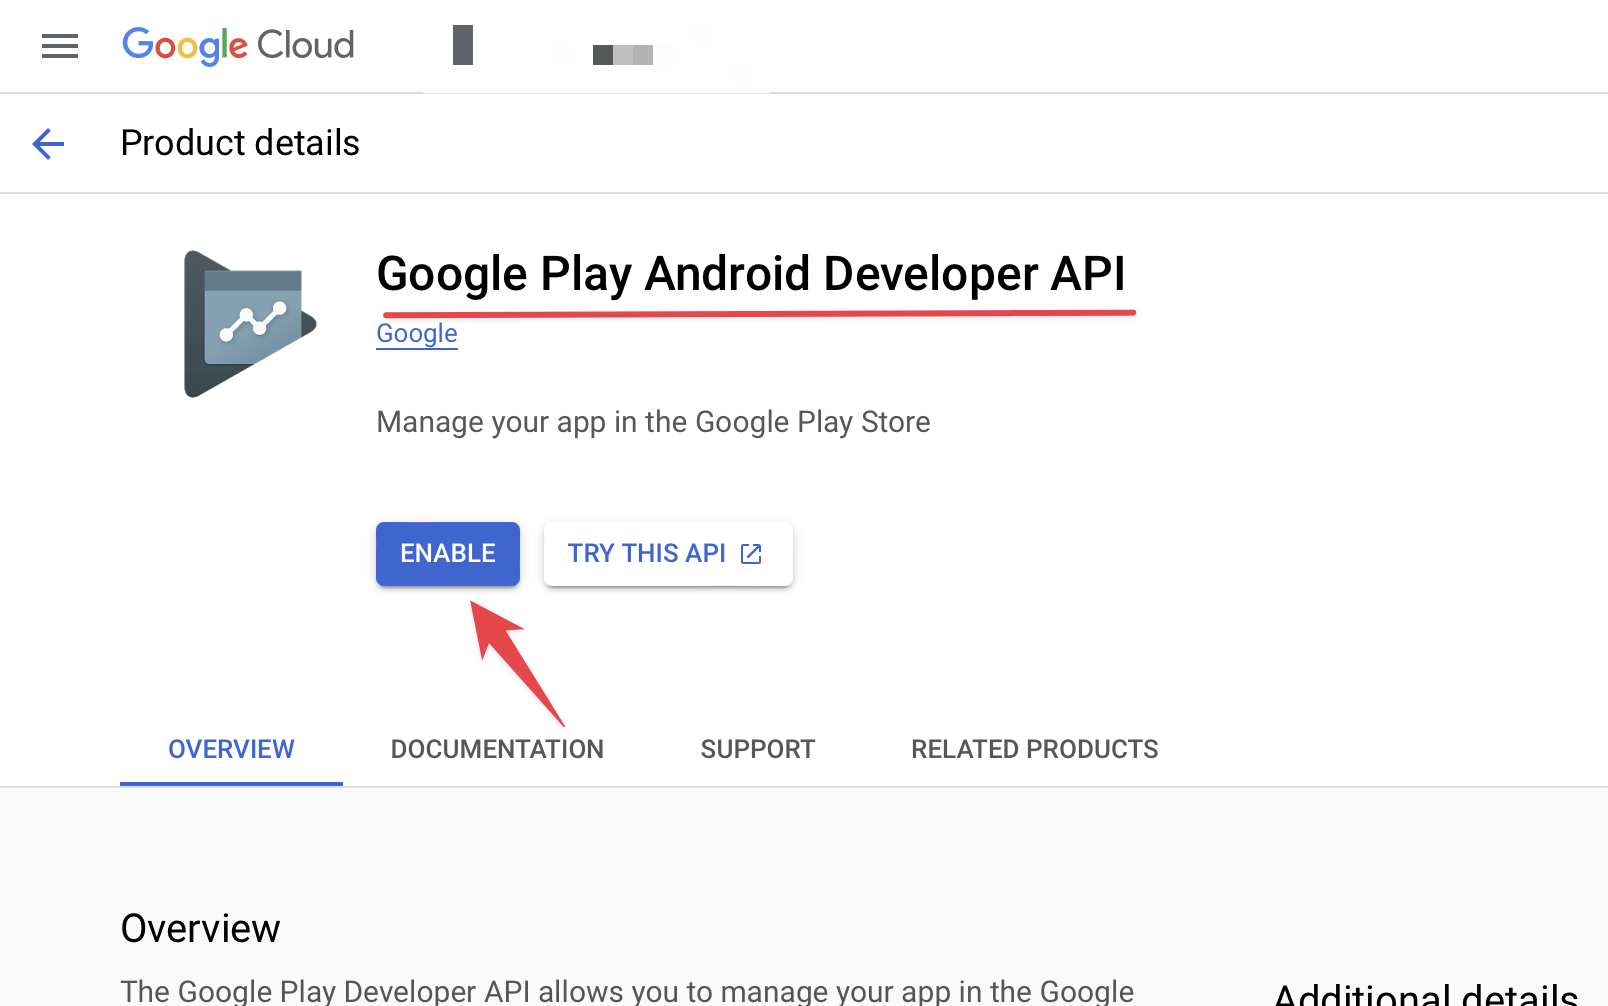
  6. Enable [Google Play Android Developer API](https://console.cloud.google.com/apis/library/androidpublisher.googleapis.com).
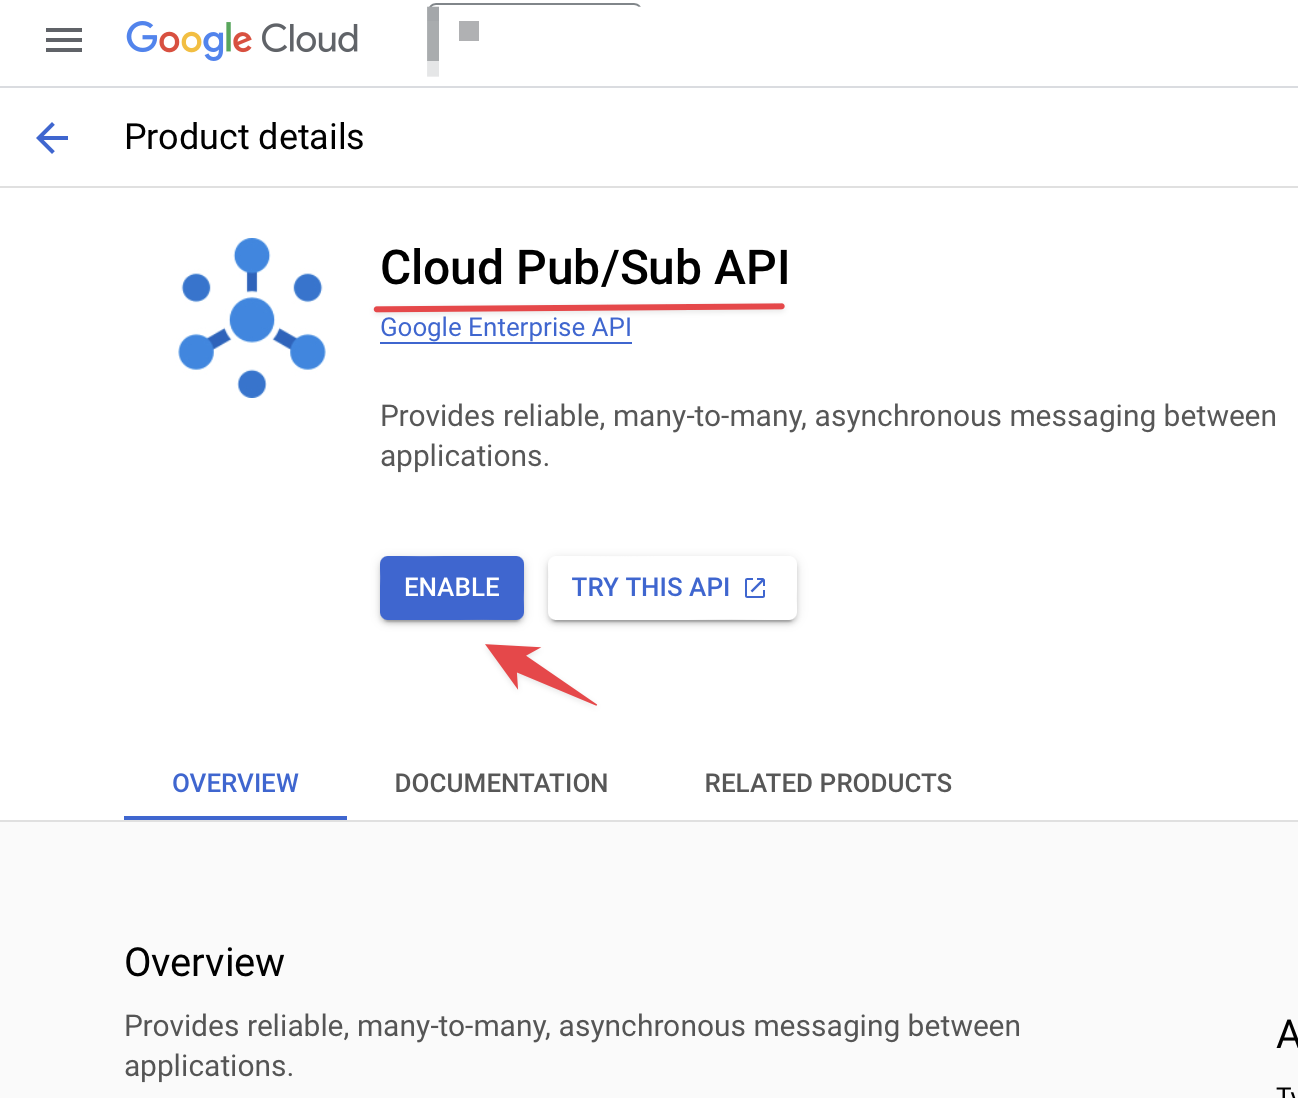
 7. Enable [Cloud Pub/Sub API](https://console.cloud.google.com/apis/library/pubsub.googleapis.com).
 ## 2. Create a Service account in the Google Cloud Console
1. Go to the [Google Cloud Console](https://console.cloud.google.com/welcome) ➡ [IAM & Admin](https://console.cloud.google.com/iam-admin/iam) ➡ [Service Accounts](https://console.cloud.google.com/iam-admin/serviceaccounts).
1. Add a role **Release manager** to it.
2. Click **Create Service Account**.
## 2. Create a Service account in the Google Cloud Console
1. Go to the [Google Cloud Console](https://console.cloud.google.com/welcome) ➡ [IAM & Admin](https://console.cloud.google.com/iam-admin/iam) ➡ [Service Accounts](https://console.cloud.google.com/iam-admin/serviceaccounts).
1. Add a role **Release manager** to it.
2. Click **Create Service Account**.  3. Enter your service account name, copy its **ID**, and click **Create and Continue**.
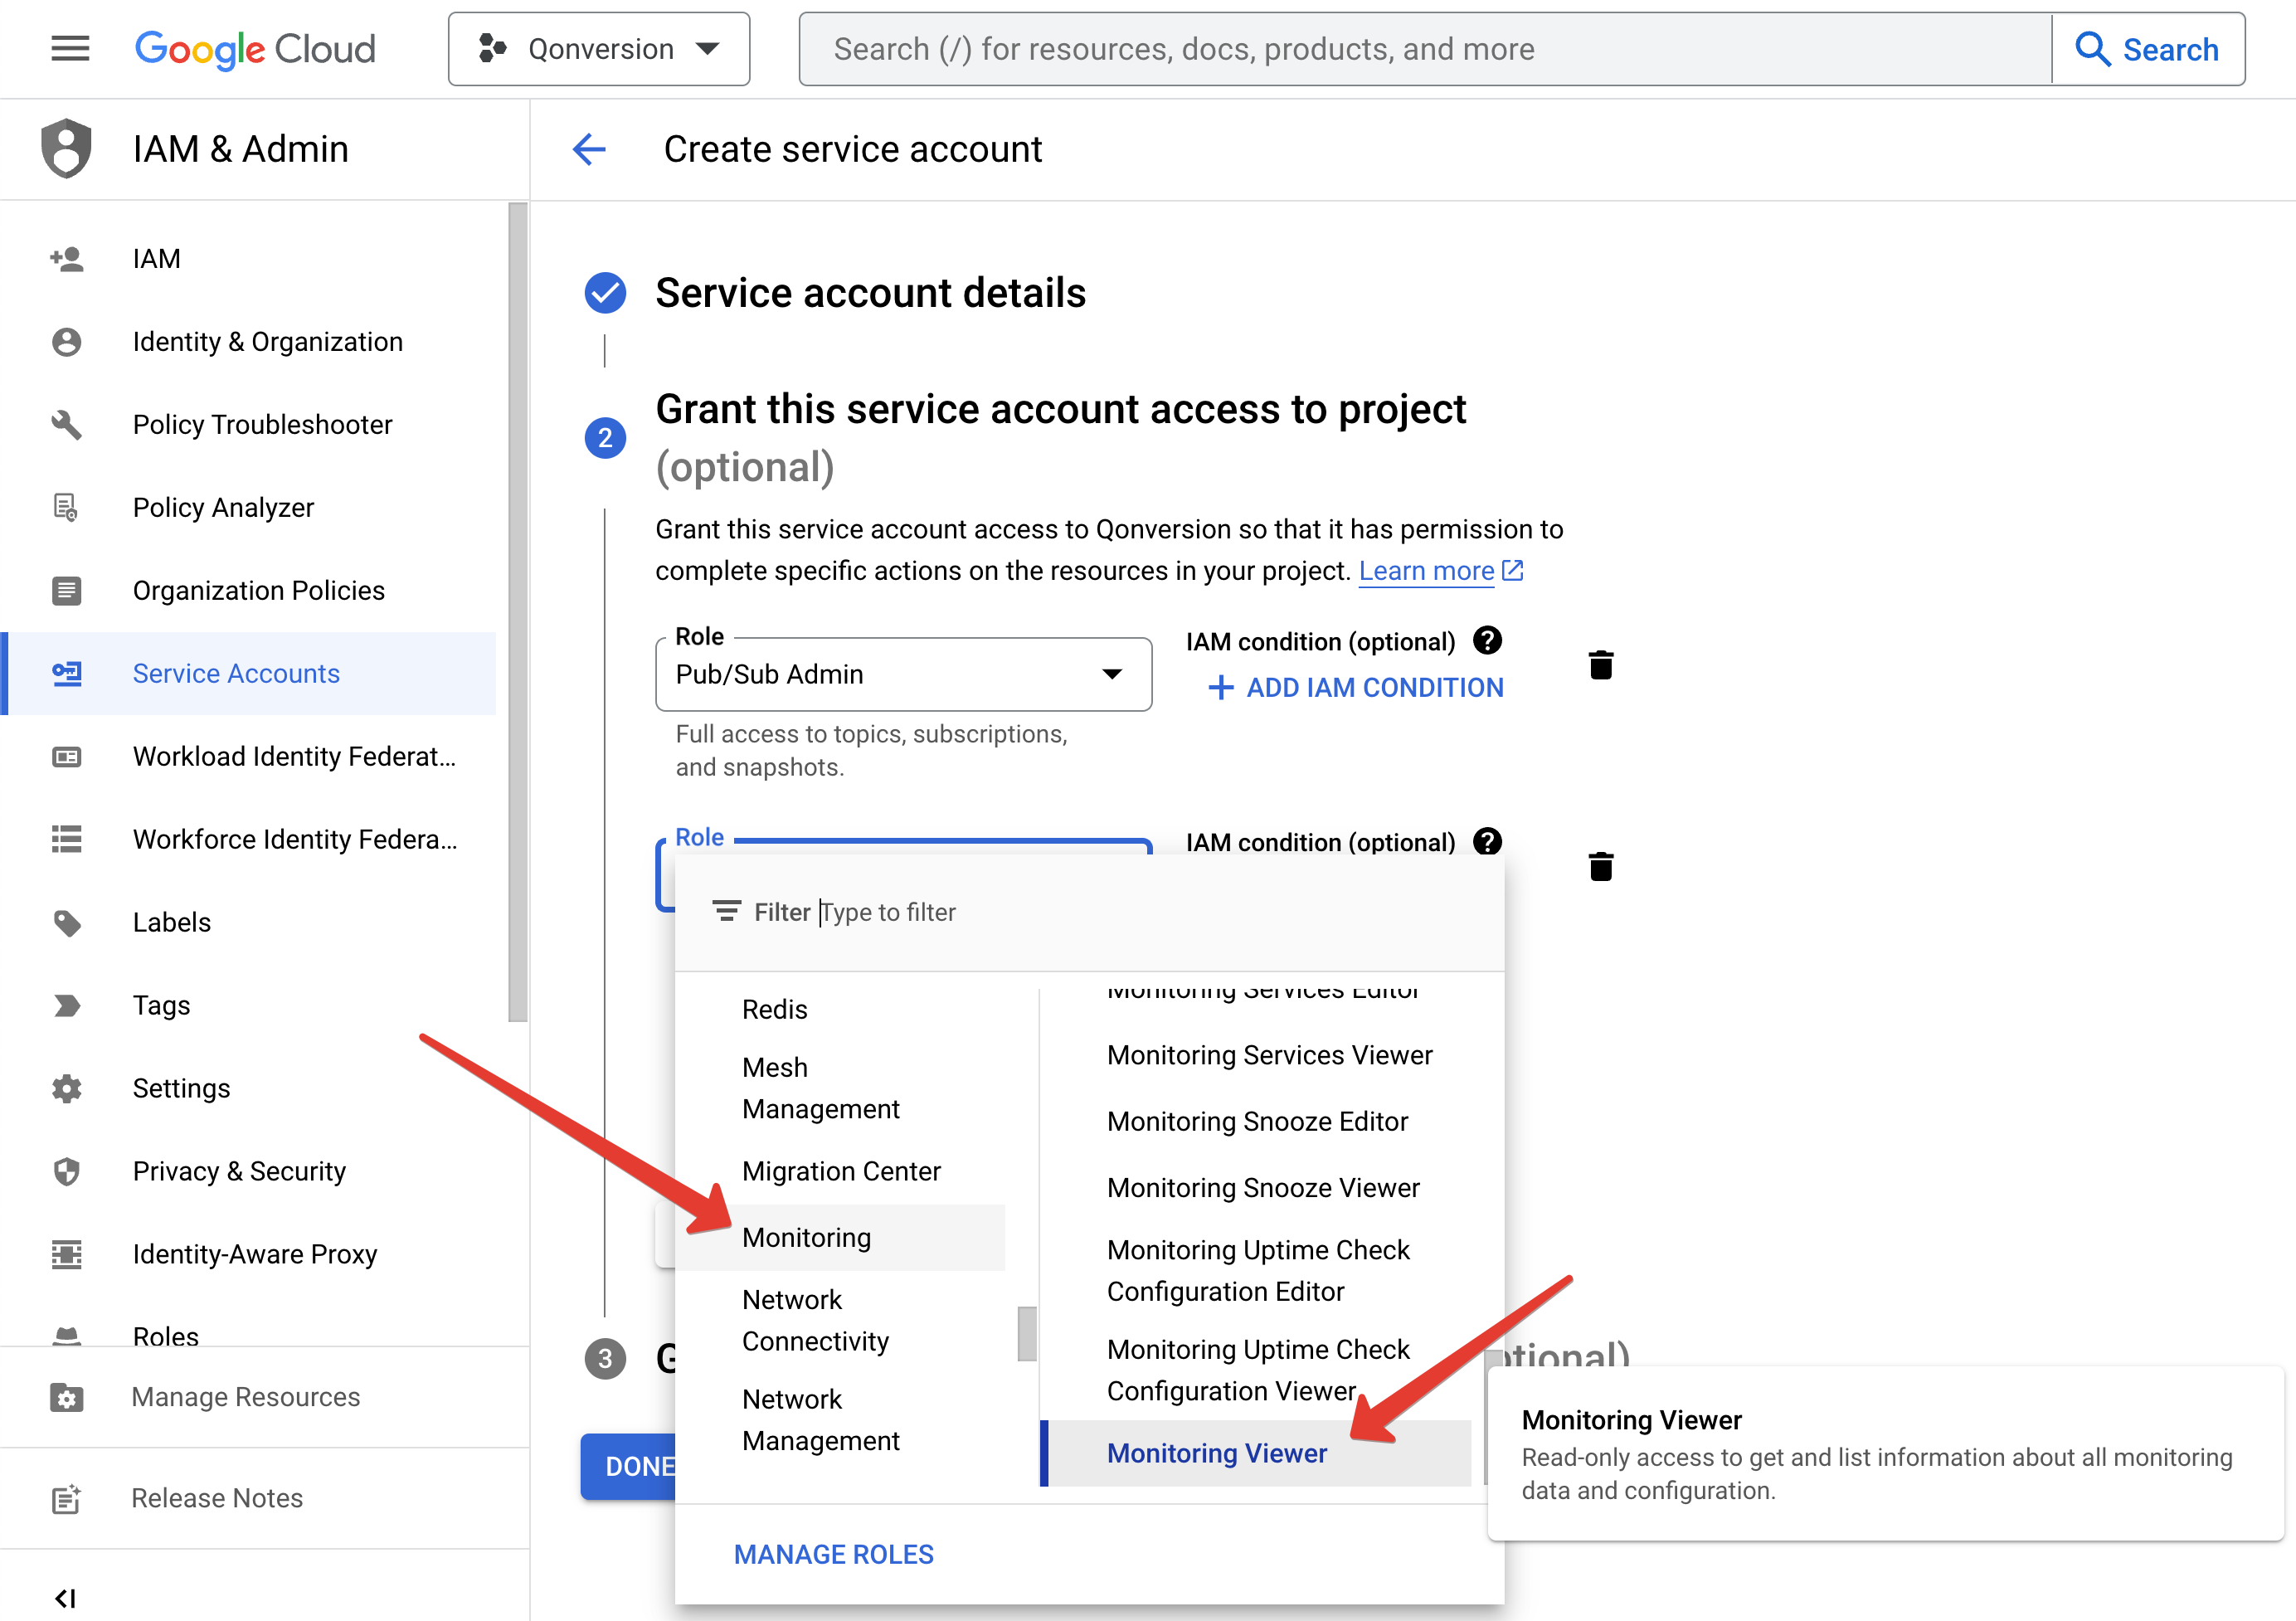
  4. Grant this service account access to the project by enabling:
* **Pub/Sub Admin** (to enable [Google Developer Notifications](google-developer-notifications))
4. Grant this service account access to the project by enabling:
* **Pub/Sub Admin** (to enable [Google Developer Notifications](google-developer-notifications)) 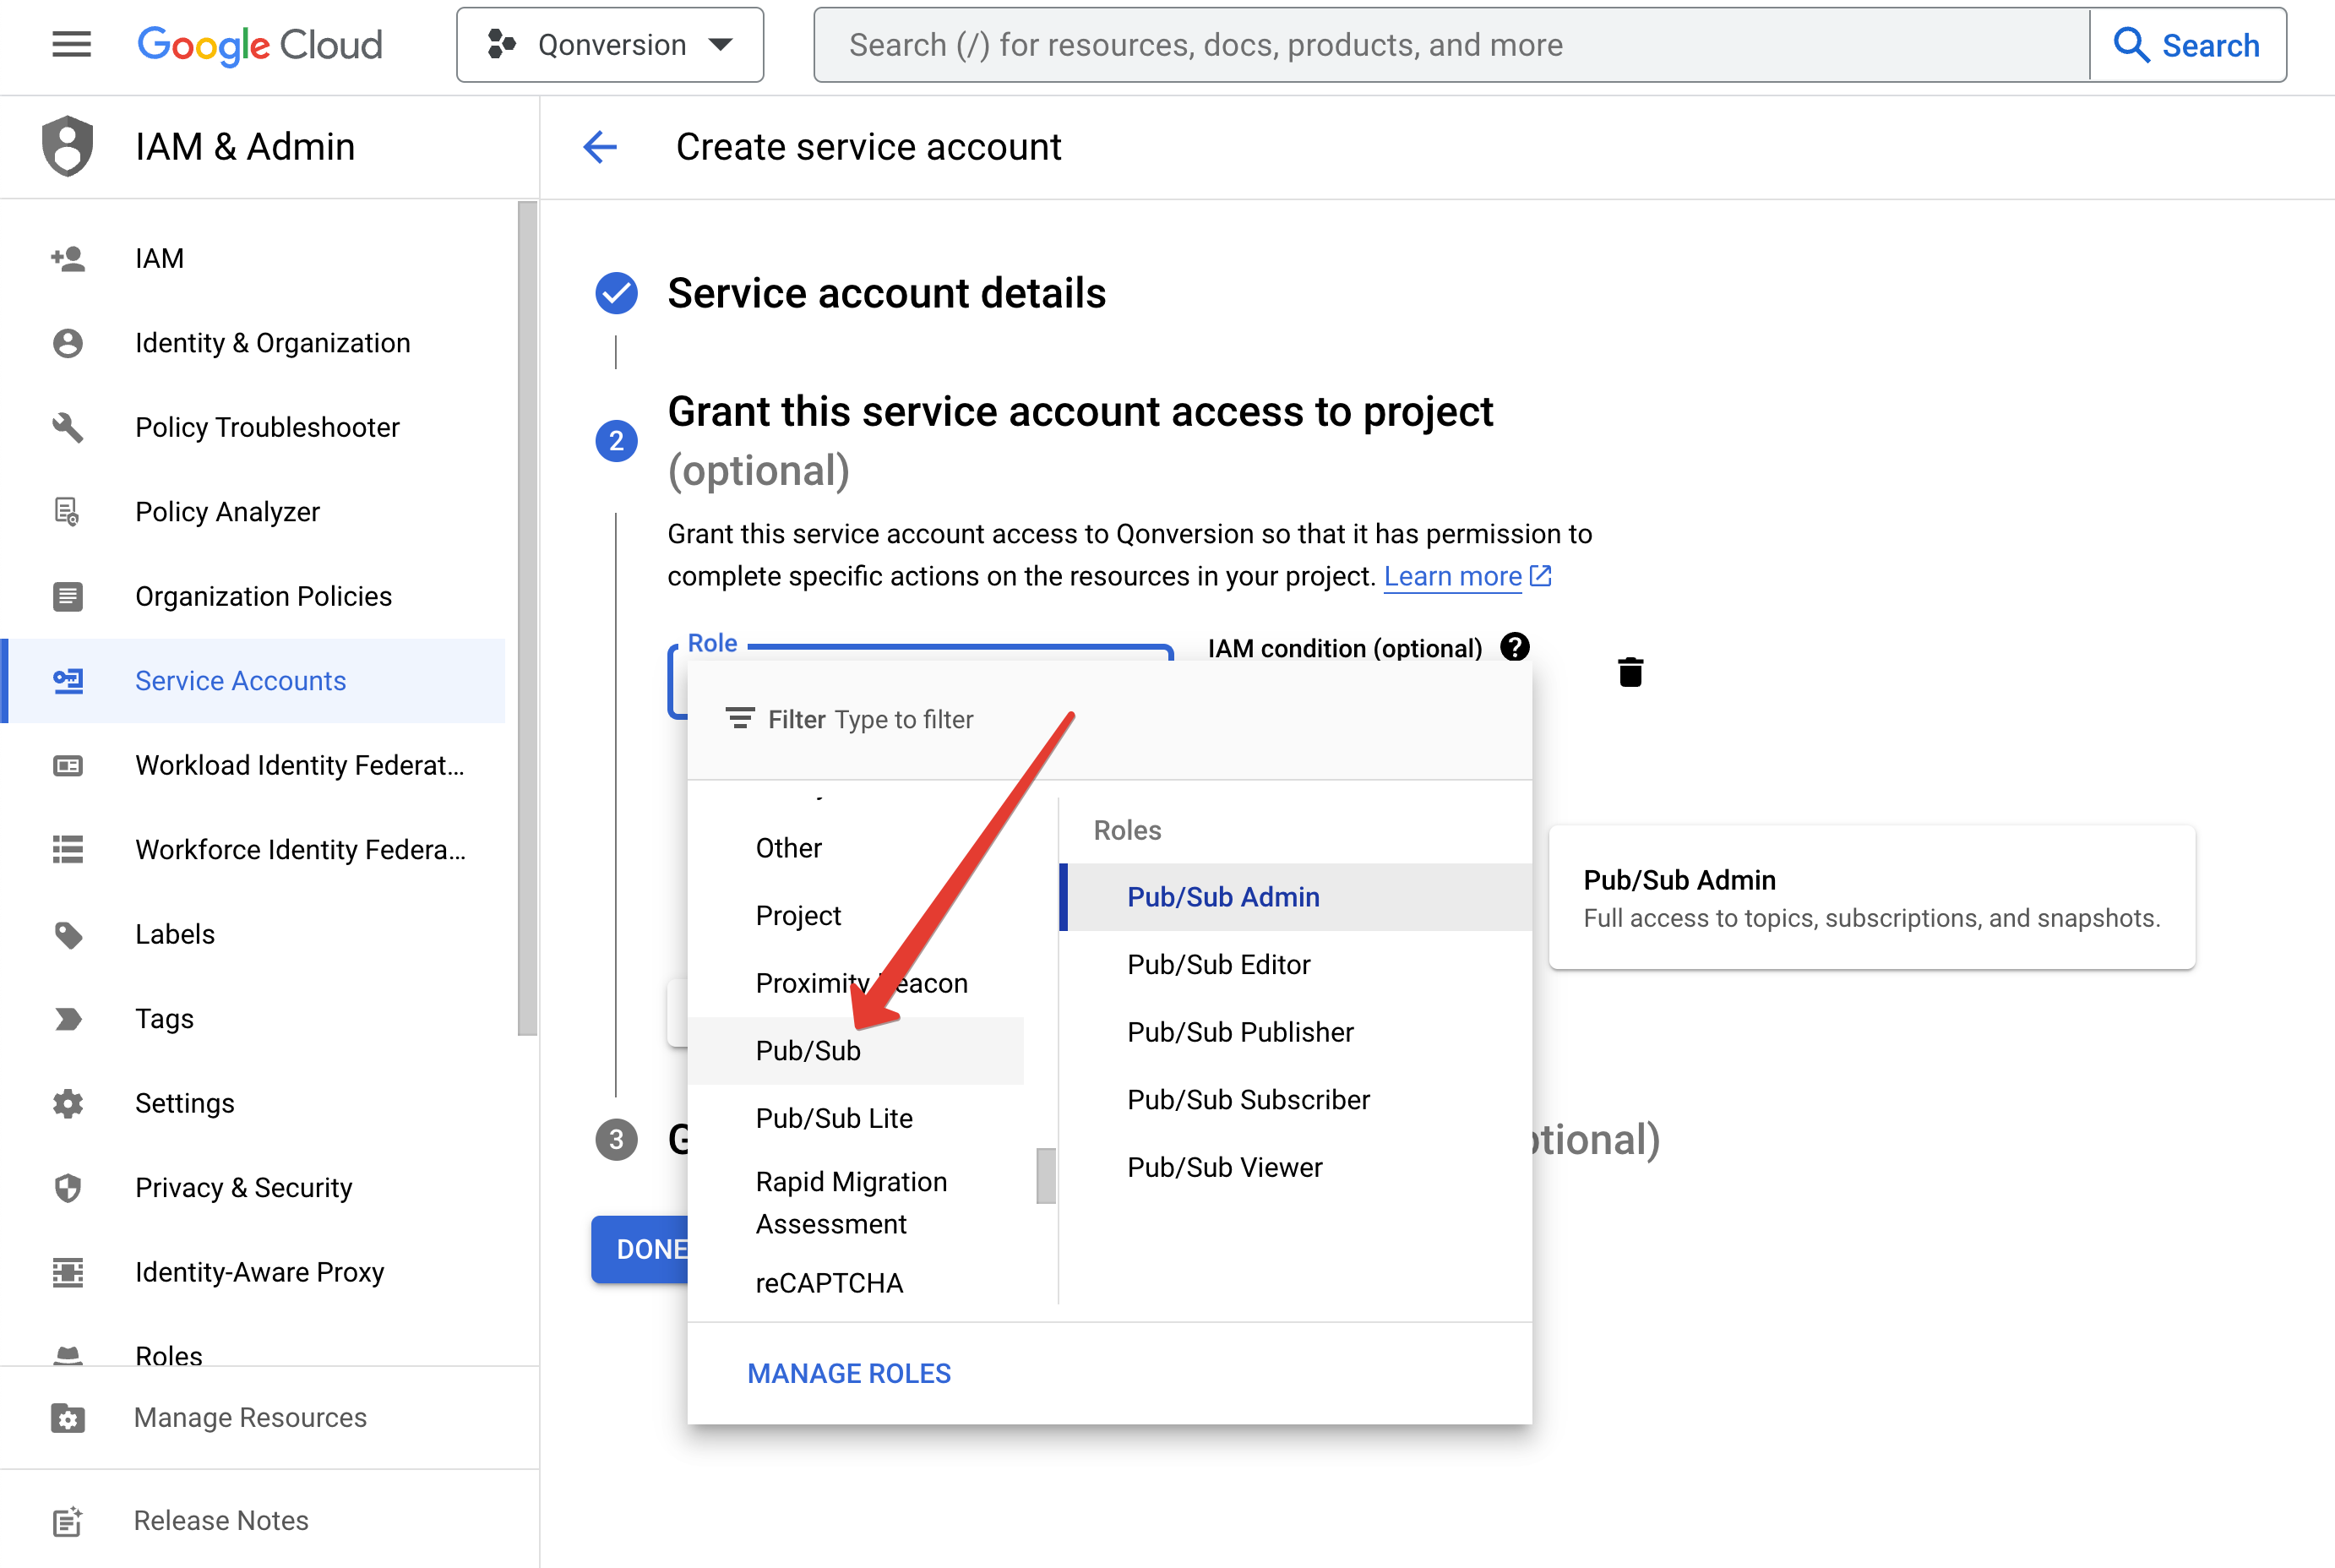 * **Monitoring Viewer** (to allow monitoring of the notification queue)
  5. Skip the last step and click **Done**.
  ## 3. Create and download the service key
1. Go to the **Service Accounts** section in the Google Cloud Console, choose your recently created key, click on the three dots to open the Actions dropdown menu, and then choose **Manage Keys**.
## 3. Create and download the service key
1. Go to the **Service Accounts** section in the Google Cloud Console, choose your recently created key, click on the three dots to open the Actions dropdown menu, and then choose **Manage Keys**. 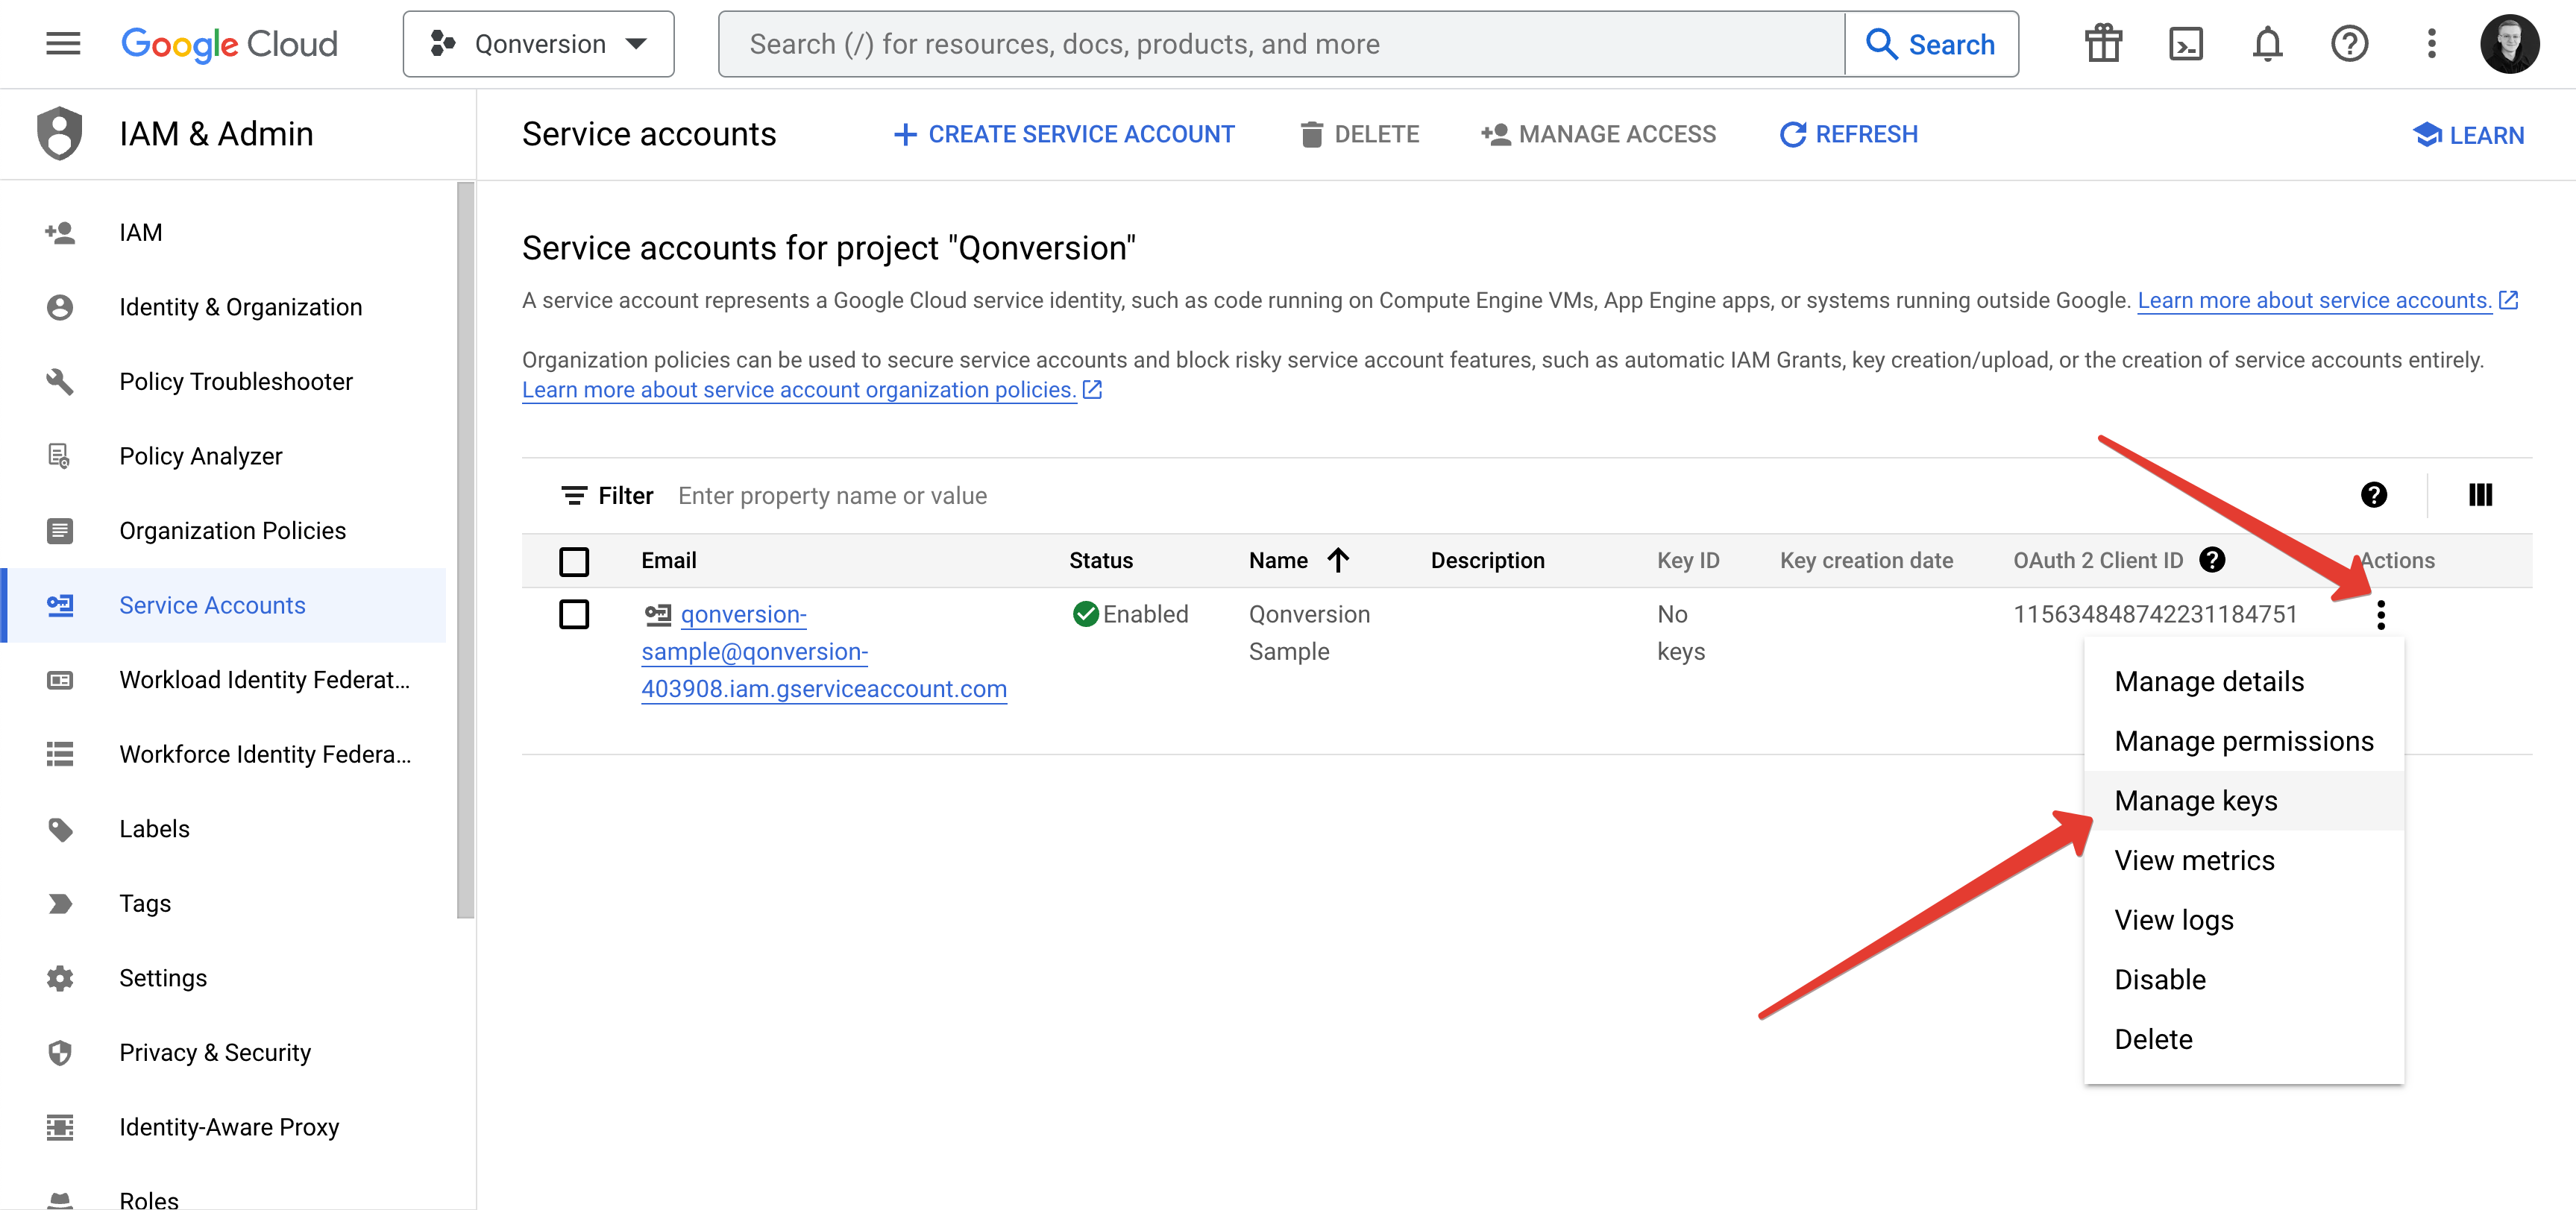 2. Click the **Add Key** button, then click **Create new key**.
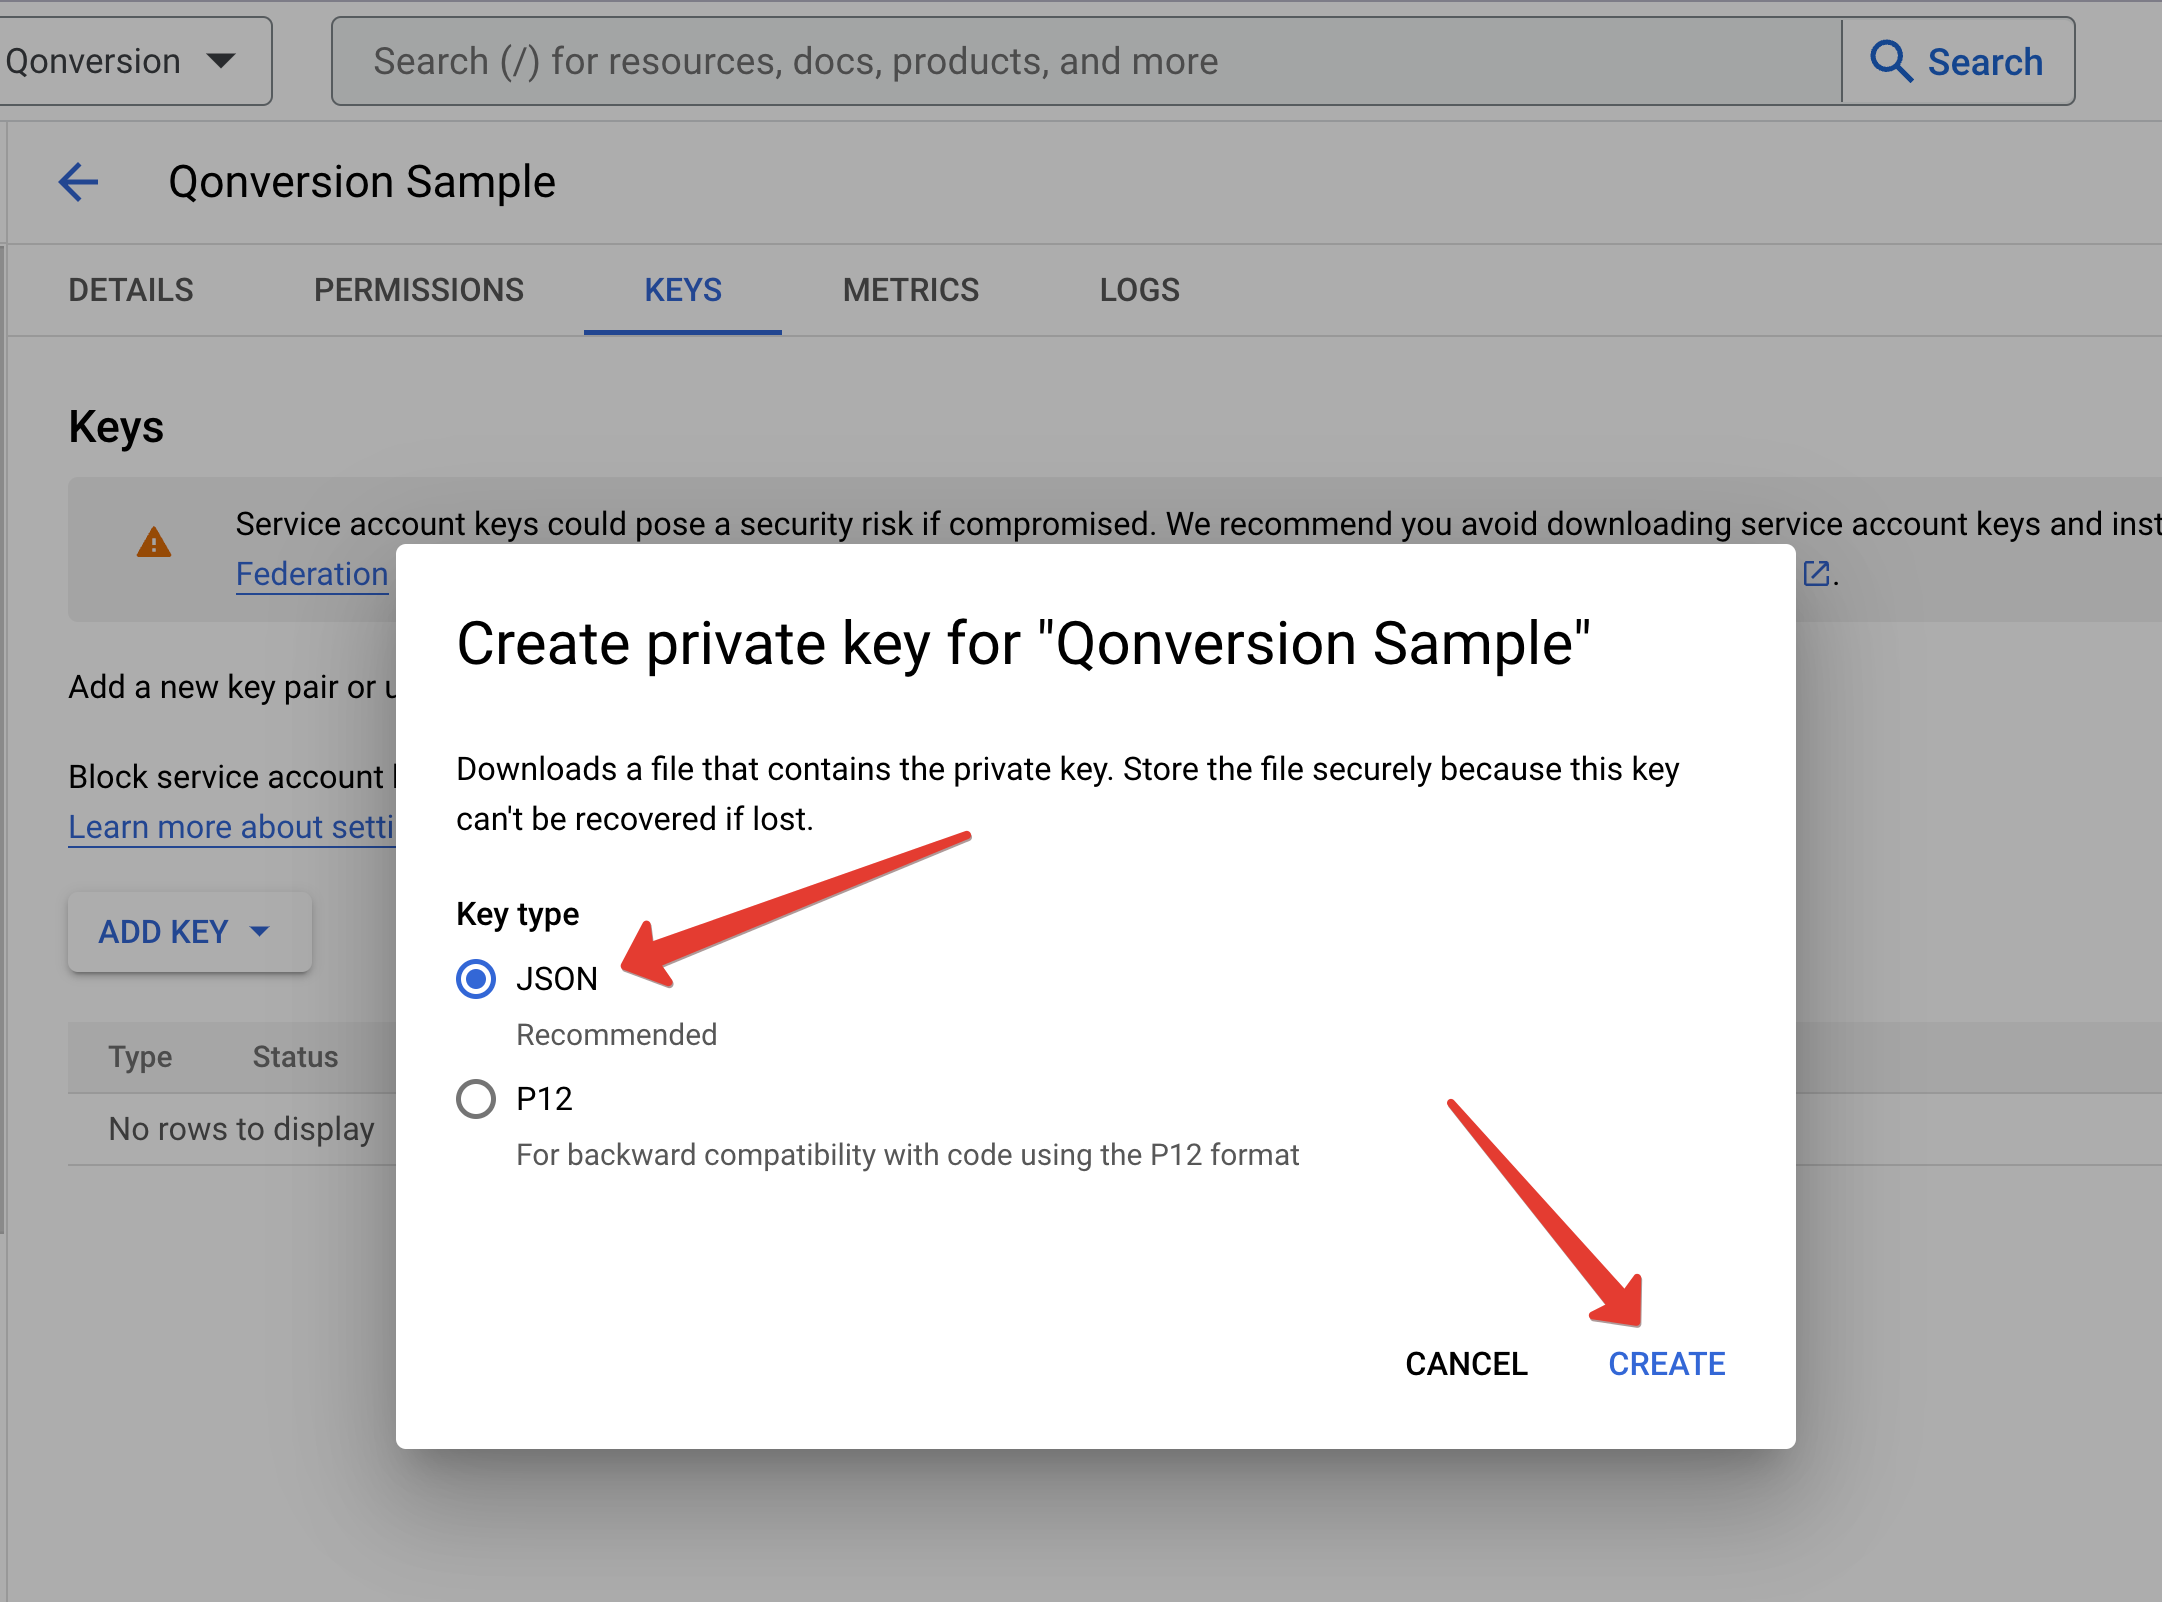
 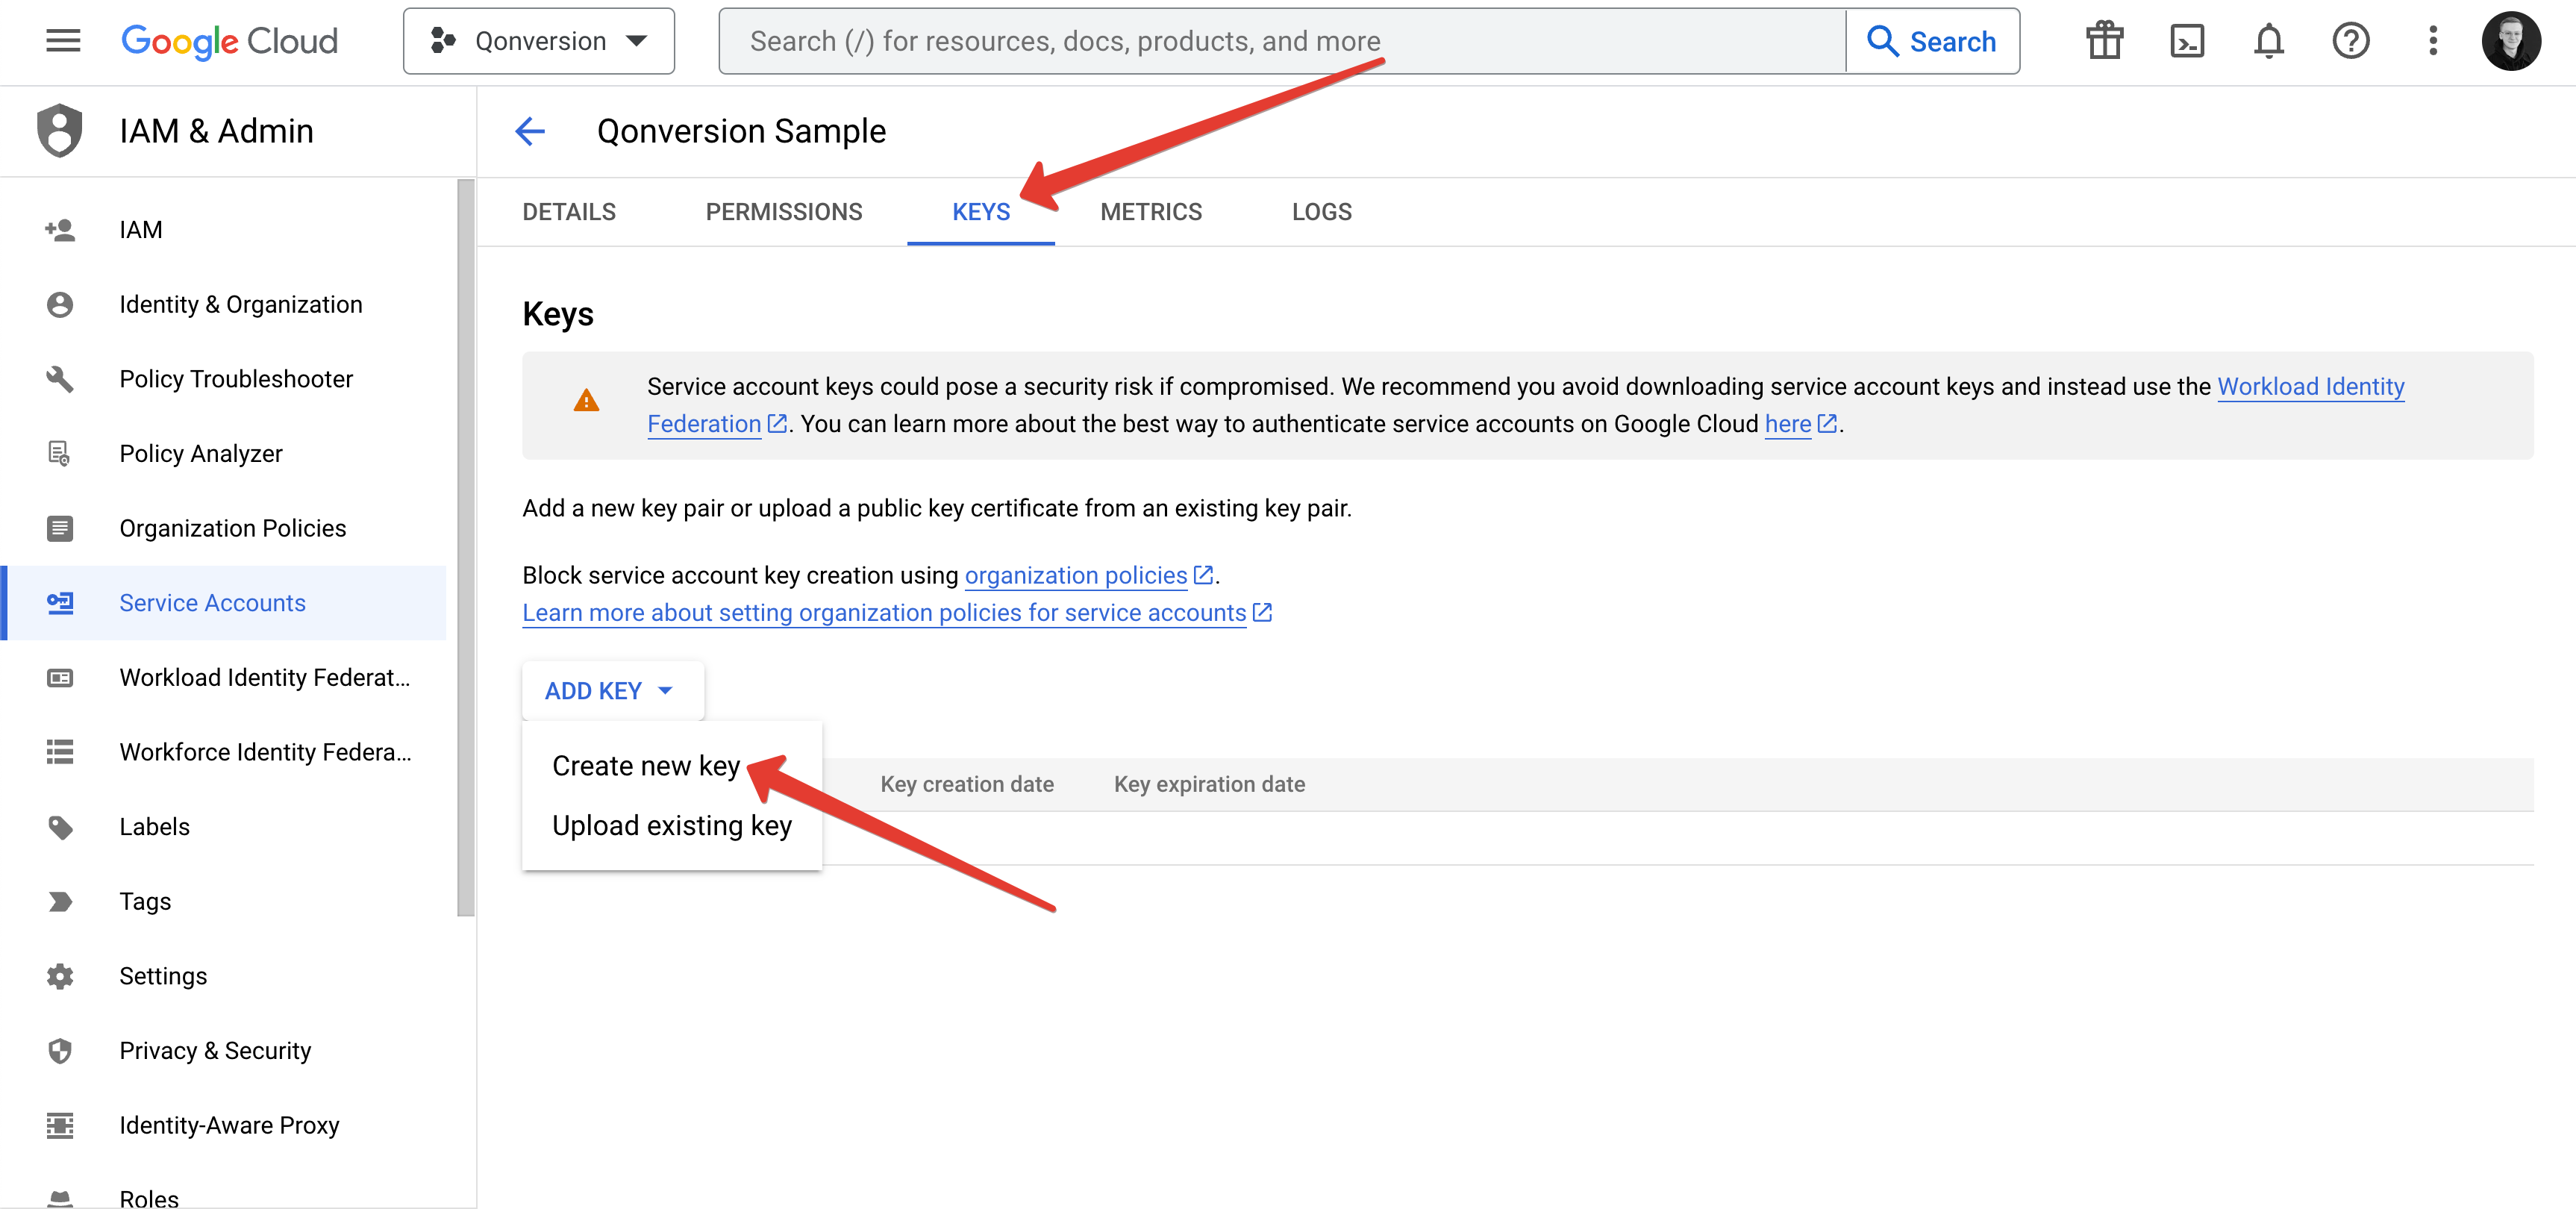 3. In the pop-up window, ensure that JSON is chosen and click **Create** to generate and download the JSON Key on your computer.
  ## 4. Grant Access to Qonversion
1. Navigate to the **Users and Permissions** section in the Google Play Console and click **Invite new users**.
## 4. Grant Access to Qonversion
1. Navigate to the **Users and Permissions** section in the Google Play Console and click **Invite new users**.  2. Enter the email of the service account that you created before, add your application, and click **Apply**.
  3. Grant the following account permissions and click **Invite user** at the bottom of the page. Afterwards, you will be directed to the **Users and Permissions** section, where you should observe your recently established account listed as active.
* View app information and download bulk reports (read-only)
* View financial data, orders, and cancellation survey response
* Manage orders and subscriptions
3. Grant the following account permissions and click **Invite user** at the bottom of the page. Afterwards, you will be directed to the **Users and Permissions** section, where you should observe your recently established account listed as active.
* View app information and download bulk reports (read-only)
* View financial data, orders, and cancellation survey response
* Manage orders and subscriptions  You have the flexibility to choose whether to check or uncheck the remaining boxes based on your specific requirements as long as the aforementioned three boxes are checked.
## 5. Paste the credentials JSON to the Qonversion project settings
Paste the content of the credentials JSON file you downloaded in step 3 to your Qonversion project settings.
You have the flexibility to choose whether to check or uncheck the remaining boxes based on your specific requirements as long as the aforementioned three boxes are checked.
## 5. Paste the credentials JSON to the Qonversion project settings
Paste the content of the credentials JSON file you downloaded in step 3 to your Qonversion project settings.
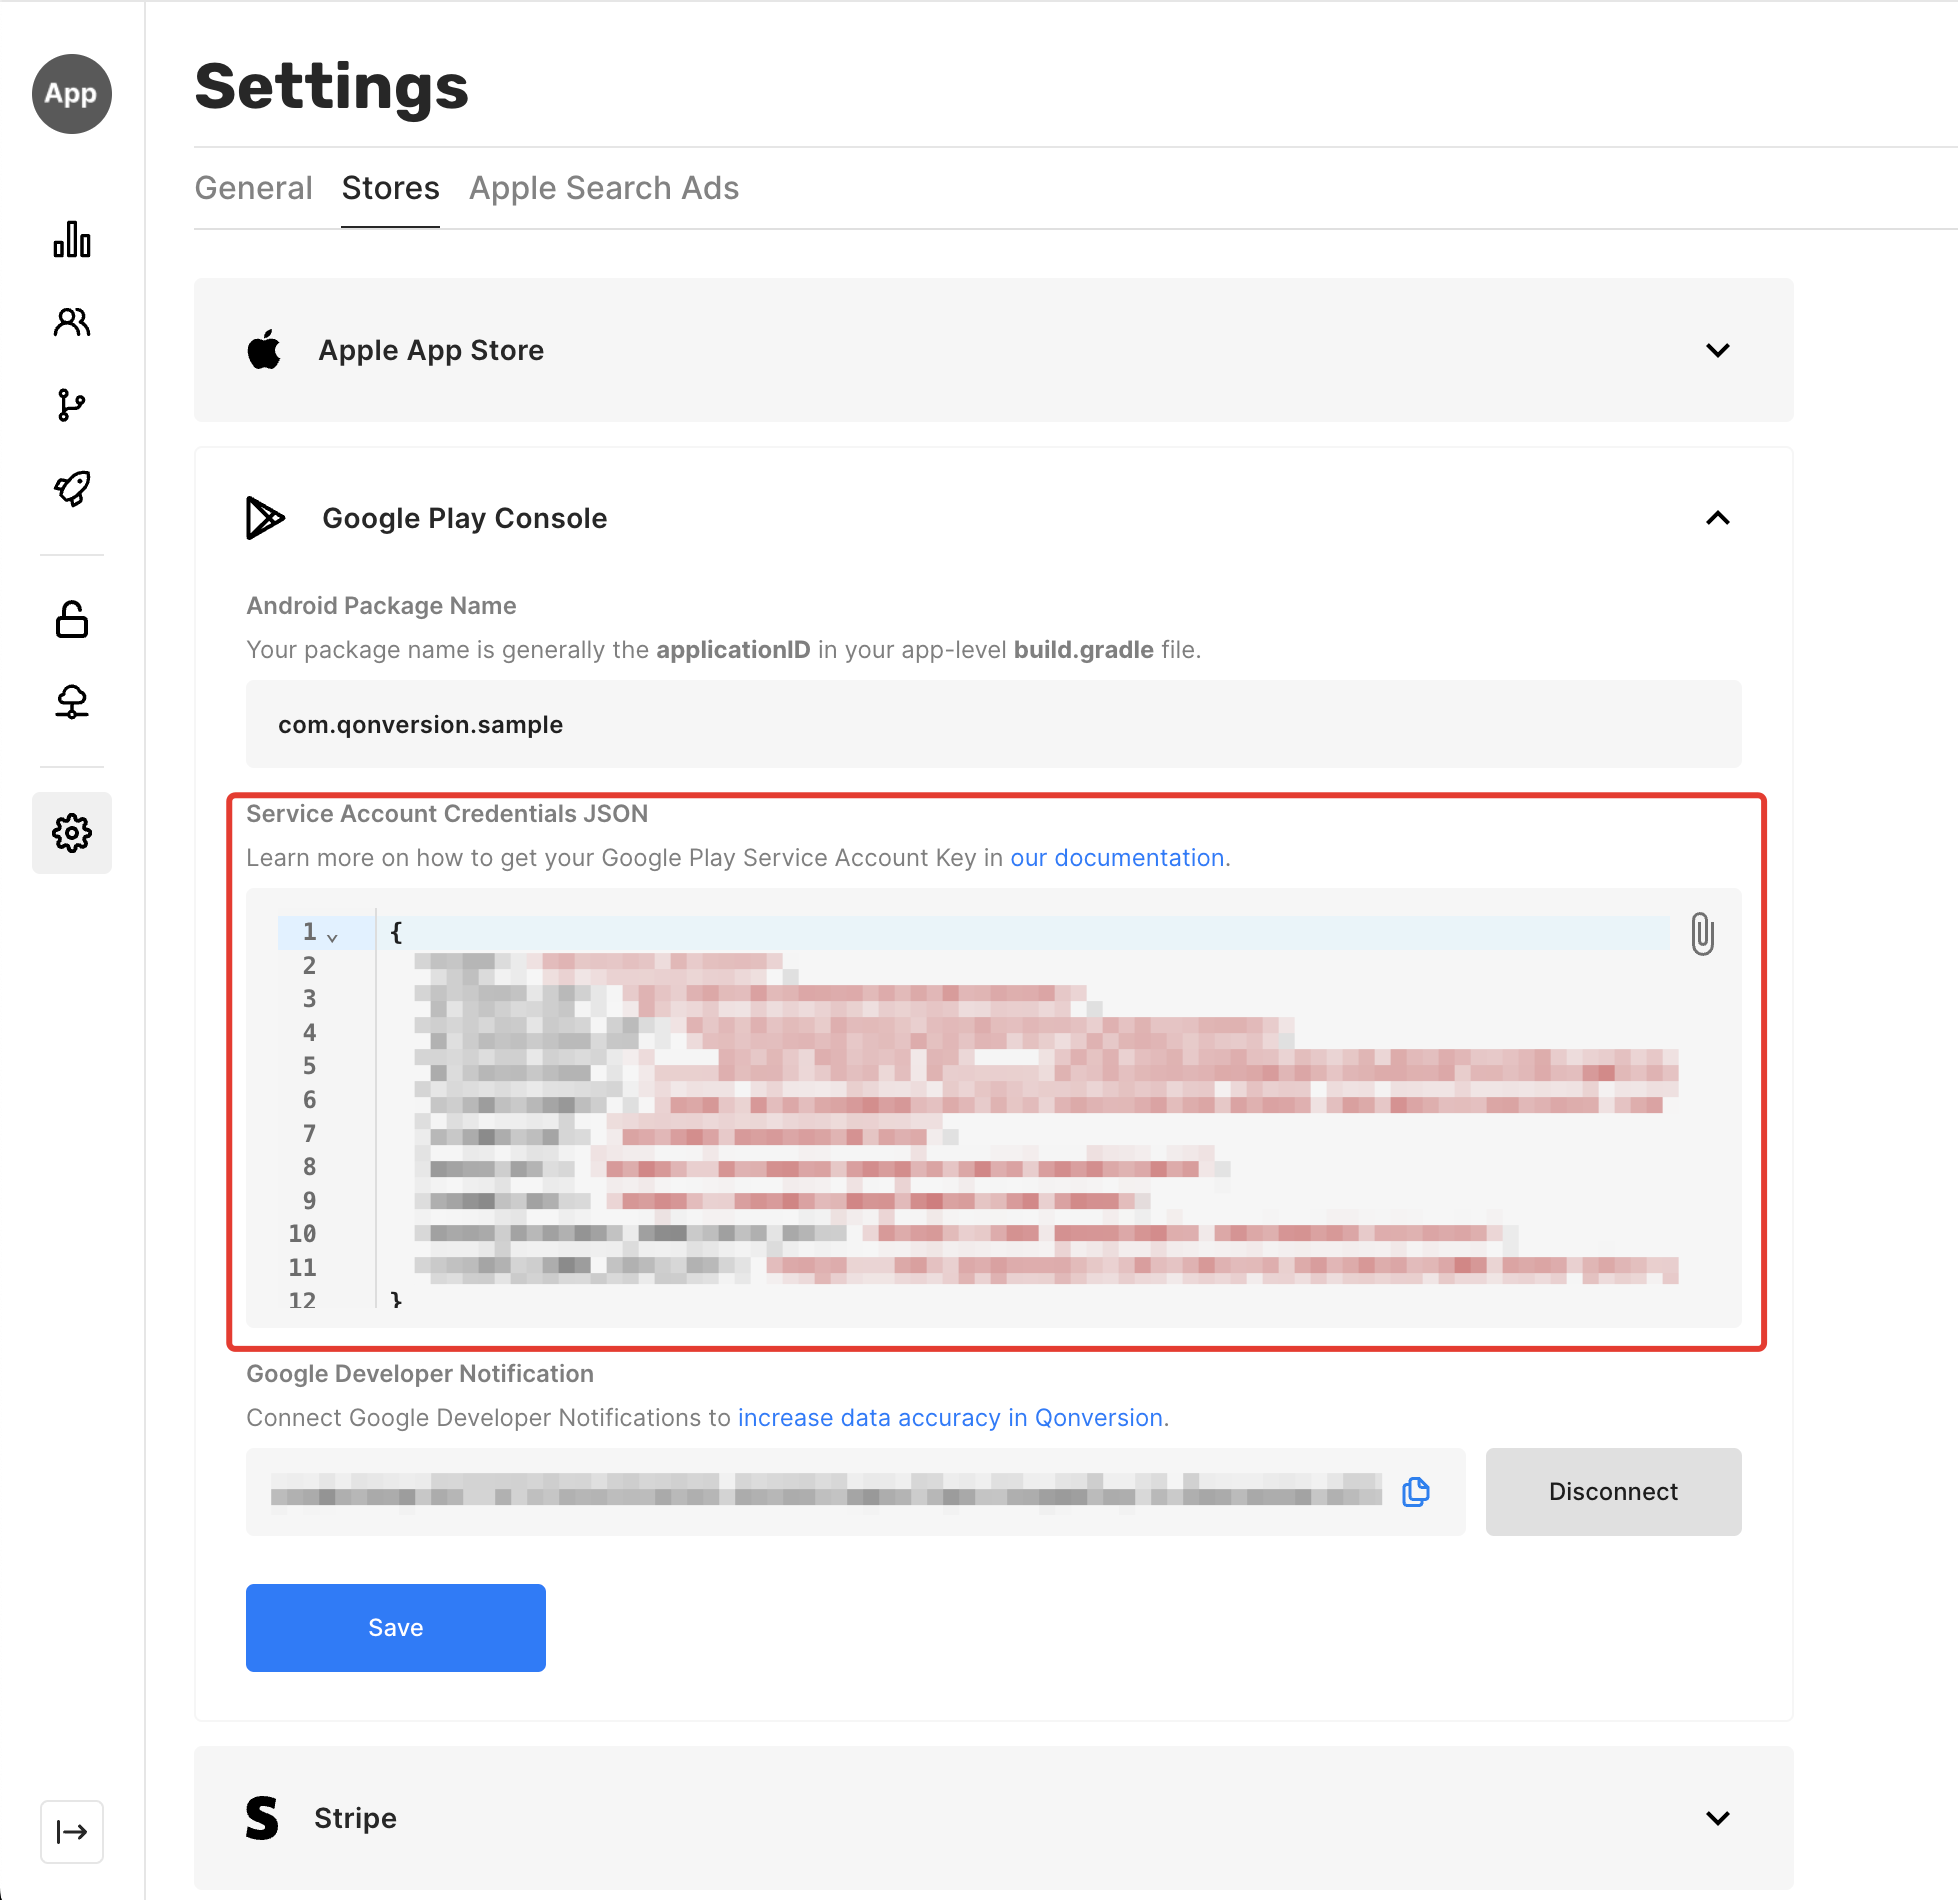 It takes up to 24 hours for your Google service credentials to work properly with the Android Developer API. You may see "Please provide valid JSON credentials" during the first 24 hours until the credentials start working properly.
If [in-app products](android-in-app-products) are created before granting users access or linking Google Cloud Project to the service account, it can cause problems with the receipt validation using Google Play Android Developer API. Google Play Developer API can return the following error *"The current user has insufficient permissions to perform the requested operation."*
When facing this problem, open the In-app products or Subscription tab on the Google Play Console and make some updates. For example, you can edit the product description and save it.
***
[App Store Connect Shared Secret](ios-app-store-info-fields#2-generate-the-app-specific-shared-secret)
[\[Jan 2026\] Migration guide. Cordova 7.](jan-2026-migration-guide-cordova-7)
It takes up to 24 hours for your Google service credentials to work properly with the Android Developer API. You may see "Please provide valid JSON credentials" during the first 24 hours until the credentials start working properly.
If [in-app products](android-in-app-products) are created before granting users access or linking Google Cloud Project to the service account, it can cause problems with the receipt validation using Google Play Android Developer API. Google Play Developer API can return the following error *"The current user has insufficient permissions to perform the requested operation."*
When facing this problem, open the In-app products or Subscription tab on the Google Play Console and make some updates. For example, you can edit the product description and save it.
***
[App Store Connect Shared Secret](ios-app-store-info-fields#2-generate-the-app-specific-shared-secret)
[\[Jan 2026\] Migration guide. Cordova 7.](jan-2026-migration-guide-cordova-7)