> ## Documentation Index
> Fetch the complete documentation index at: https://documentation.qonversion.io/llms.txt
> Use this file to discover all available pages before exploring further.
# Overview
> Quick start guide walks you through setting up Qonversion
## 1. Choose Qonversion mode you want to implement
* Implement Qonversion Analytics Mode in 20 minutes to get the best-in-class mobile subscription analytics and leverage subscription data with integrations and webhooks.
* Subscription Management Mode is required if you are looking to implement and manage subscriptions including managing cross-platform user access. The comparison of the features available with each mode is presented below:
| Features | Analytics Mode (Observer) | Subscription Management Mode |
| ------------------------------------------------------------------------------------------------- | ------------------------- | ---------------------------- |
| Implementation time | **20 minutes** | **2+ hours** |
| Subscription Analytics | ✅ | ✅ |
| Real-time Monitoring | ✅ | ✅ |
| Integrations (send data to other platforms) | ✅ | ✅ |
| Apple Search Ads Insights | ✅ | ✅ |
| Raw Data Export | ✅ | ✅ |
| Webhooks | ✅ | ✅ |
| Subscriber Details & Custom User Properties | ✅ | ✅ |
| Paywall experiments | ✅ | ✅ |
| Subscription Management (fetch in-app product data -> make purchase -> check subscription status) | ❌ | ✅ |
## 2. Create a project and register your app
1. Navigate to the [New Project](https://dash.qonversion.io/app/start/create) page and provide a new project's name. One Project in Qonversion supports iOS, Android, and Web apps.
2. In [Settings](https://dash.qonversion.io/project/settings), select the platform for your app and provide platform-specific data:
* **IOS App**:
1. App-Specific Shared secret, you can find more details [here](ios-app-store-info-fields#2-generate-the-app-specific-shared-secret)
2. Your app's App Store ID. To get your app's App Store ID, navigate to the Apps tab in your App Store Connect account. Click on your app. You can see the App ID in the URL.
* **Android App**:
1. Service Account Key credentials, you can find more details [here](android-store-setup).
2. Android package name
* **Stripe App**: Please follow [this guide](stripe-integration) to connect Stripe to Qonversion
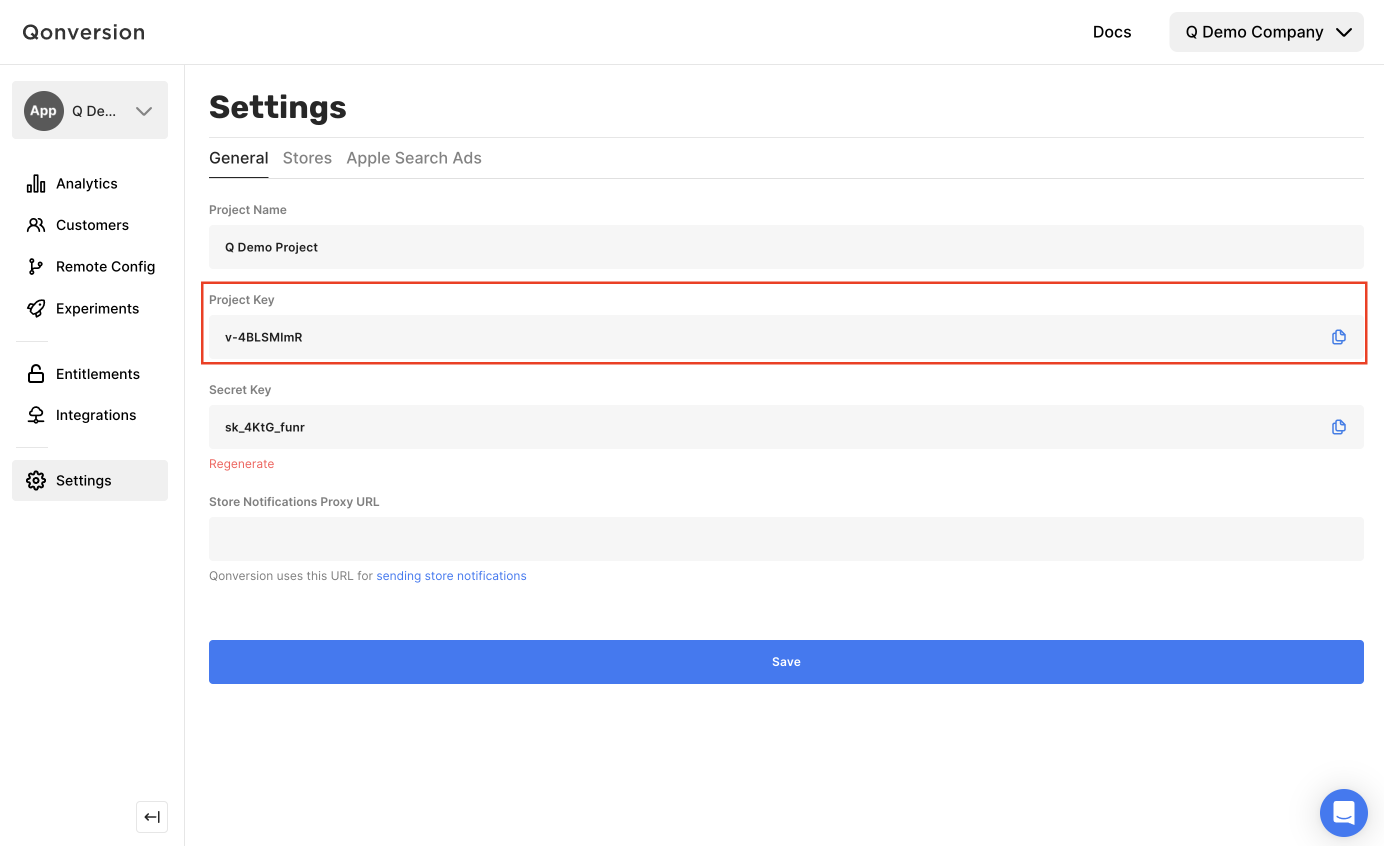
3. Get your Qonversion project key. You can find your Qonversion project key in the [Settings](https://dash.qonversion.io/project/settings) section of Qonversion. You will need this key to [configure the SDKs](install-sdk).
 Please note, it may take up to 24 hours for your Google service credentials to work properly with the Android Developer API. You may see "Please provide valid JSON credentials" during the first 24 hours until the credentials start working correctly.
## 3. Install the SDKs
→ [iOS SDK](ios-sdk-setup) → [Android SDK](android-sdk) → [Flutter SDK](flutter-sdk) → [React Native SDK](react-native-sdk) → [Unity SDK](unity-sdk) → [Cordova Plugin](cordova) → [Capacitor Plugin](capacitor) → [Web SDK](web-sdk)
### Kids Mode SDKs
If you are building an app for kids, it is necessary to follow policies and do not collect IDFA, GAID and other advertisement attributes. For Kids Mode SDK integration follow [this guide](kids-mode-sdk).
## 4. Implement Analytics or Subscription Management Mode
Please check the mode you prefer according to the [first step](quickstart#1-choose-qonversion-mode-you-want-to-implement) of this guide and follow the required option:
* For Analytics Mode follow [this guide](analytics-mode) (10 more minutes to set everything up)
* For Subscription Management Mode follow [this guide](subscription-management-mode)
## Additional Resources
→ Check out the [Sample Apps](sample-apps) → Tips on [testing](testing) → [Troubleshooting](troubleshooting) → [Migrating In-App Subscriptions](migrating-subscriptions)
***
What’s Next
* [Analytics (Observer) Mode](analytics-mode)
* [Subscription Management Mode](subscription-management-mode)
Please note, it may take up to 24 hours for your Google service credentials to work properly with the Android Developer API. You may see "Please provide valid JSON credentials" during the first 24 hours until the credentials start working correctly.
## 3. Install the SDKs
→ [iOS SDK](ios-sdk-setup) → [Android SDK](android-sdk) → [Flutter SDK](flutter-sdk) → [React Native SDK](react-native-sdk) → [Unity SDK](unity-sdk) → [Cordova Plugin](cordova) → [Capacitor Plugin](capacitor) → [Web SDK](web-sdk)
### Kids Mode SDKs
If you are building an app for kids, it is necessary to follow policies and do not collect IDFA, GAID and other advertisement attributes. For Kids Mode SDK integration follow [this guide](kids-mode-sdk).
## 4. Implement Analytics or Subscription Management Mode
Please check the mode you prefer according to the [first step](quickstart#1-choose-qonversion-mode-you-want-to-implement) of this guide and follow the required option:
* For Analytics Mode follow [this guide](analytics-mode) (10 more minutes to set everything up)
* For Subscription Management Mode follow [this guide](subscription-management-mode)
## Additional Resources
→ Check out the [Sample Apps](sample-apps) → Tips on [testing](testing) → [Troubleshooting](troubleshooting) → [Migrating In-App Subscriptions](migrating-subscriptions)
***
What’s Next
* [Analytics (Observer) Mode](analytics-mode)
* [Subscription Management Mode](subscription-management-mode)