> ## Documentation Index
> Fetch the complete documentation index at: https://documentation.qonversion.io/llms.txt
> Use this file to discover all available pages before exploring further.
# In-App Purchase API Key
> How to create an In-App Purchase API key and connect it to Qonversion so we can validate transactions, detect refunds, look up subscription status, and read transaction history.
The **In-App Purchase API key** lets Qonversion call Apple's runtime endpoints with your app's identity. We use it to:
* **Validate every transaction** against the App Store Server API.
* **Detect refunds and consumption decisions** from the live billing system.
* **Look up subscription status and transaction history** when responding to user requests.
* **Sign promotional offer signatures** for the App Store Server API.
This is a **different key** from the [App Store Connect API key](app-store-connect-api-key) you generated for Step 1. They live under different tabs in App Store Connect and they are **not interchangeable** — Apple will reject one if you use it where the other is expected.
## 1. Make sure you have the right role
To generate an In-App Purchase API key, your App Store Connect user must have one of these roles:
* **Account Holder**
* **Admin**
Contact your team's Account Holder if you don't have one of these roles. App Manager is **not** sufficient for this key type.
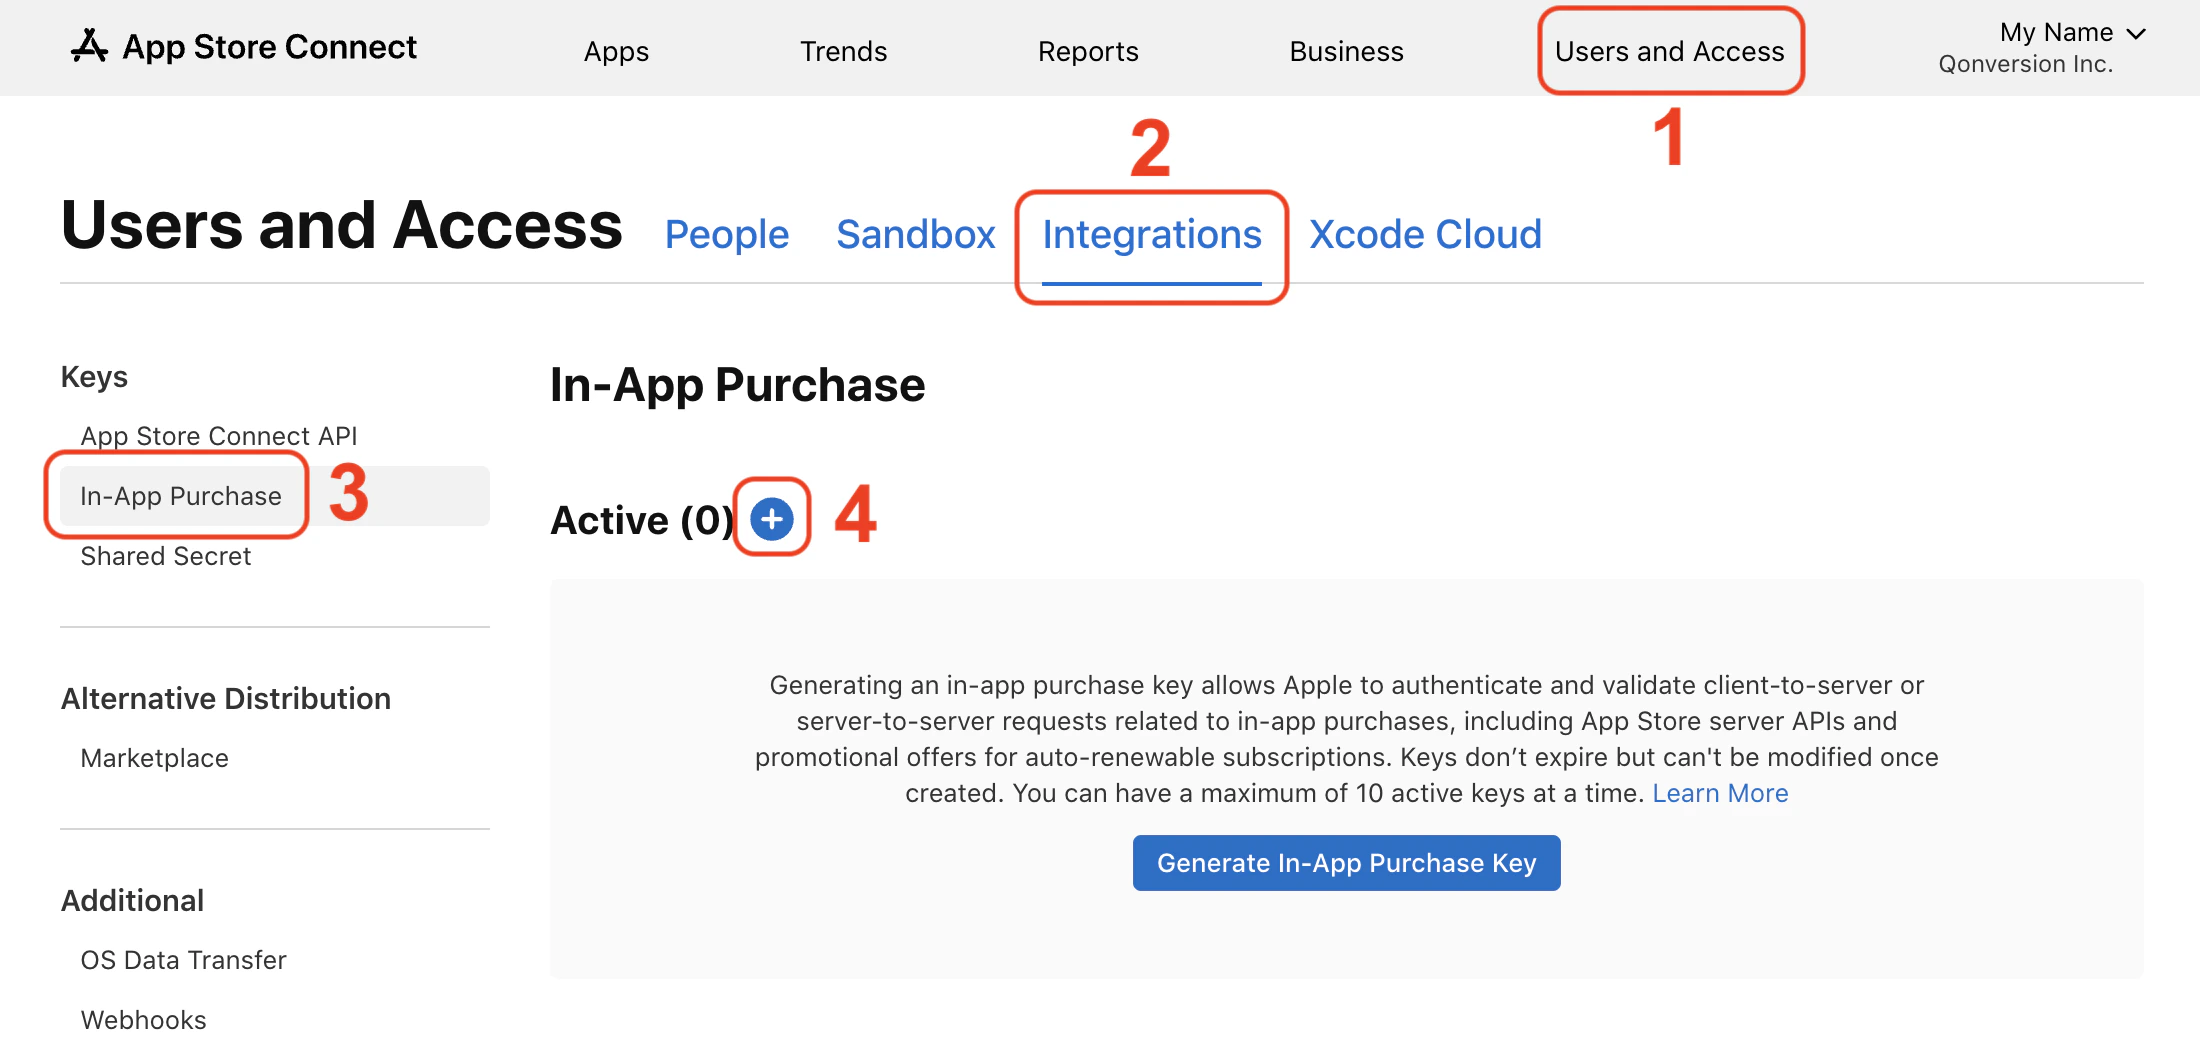
## 2. Open the In-App Purchase tab
1. [Log in](https://appstoreconnect.apple.com/login) to App Store Connect.
2. Click **Users and Access** in the top navigation.
3. Open the **Integrations** tab.
4. Switch to the **In-App Purchase** sub-tab (not "App Store Connect API").
5. Click **Generate In-App Purchase Key** (or **+** if you already have keys).
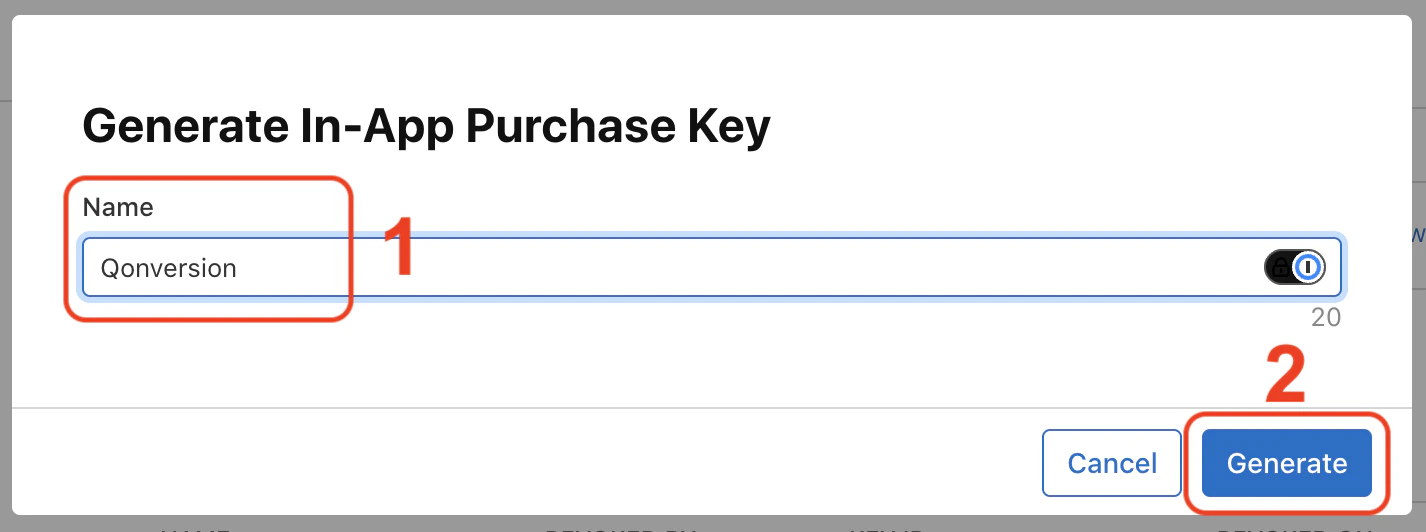
 ## 3. Generate a new key
1. Give it a clear name, e.g. **Qonversion**.
2. Click **Generate**.
## 3. Generate a new key
1. Give it a clear name, e.g. **Qonversion**.
2. Click **Generate**.
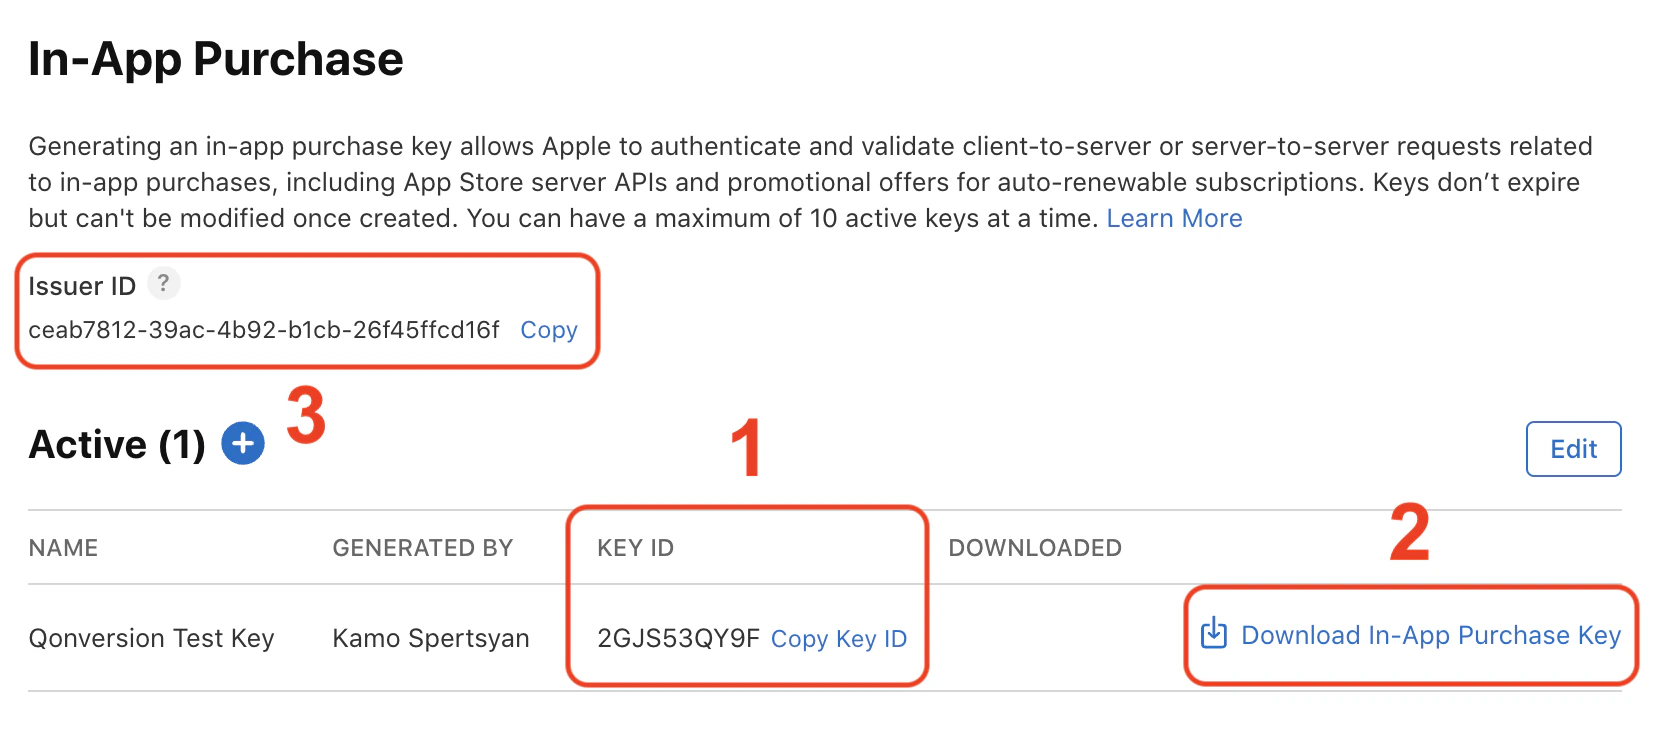
 ## 4. Copy the Key ID and Issuer ID, and download the .p8 private key
Everything you need lives on the same screen — copy the two identifiers and download the key file before leaving:
* Copy the **Key ID** (10-character string in the row of your new key) — this is the **Key Identifier** in Qonversion.
* Above the table, copy the **Issuer ID** (UUID format, e.g. `57246542-96fe-1a63-e053-0824d011072a`) — this is the **Issuer Identifier** in Qonversion.
* In the same row, click **Download API Key** to get the **.p8** file.
Apple lets you download the `.p8` file **only once**. If you lose it, you have to revoke the key and create a new one. Save it somewhere safe before continuing.
## 4. Copy the Key ID and Issuer ID, and download the .p8 private key
Everything you need lives on the same screen — copy the two identifiers and download the key file before leaving:
* Copy the **Key ID** (10-character string in the row of your new key) — this is the **Key Identifier** in Qonversion.
* Above the table, copy the **Issuer ID** (UUID format, e.g. `57246542-96fe-1a63-e053-0824d011072a`) — this is the **Issuer Identifier** in Qonversion.
* In the same row, click **Download API Key** to get the **.p8** file.
Apple lets you download the `.p8` file **only once**. If you lose it, you have to revoke the key and create a new one. Save it somewhere safe before continuing.
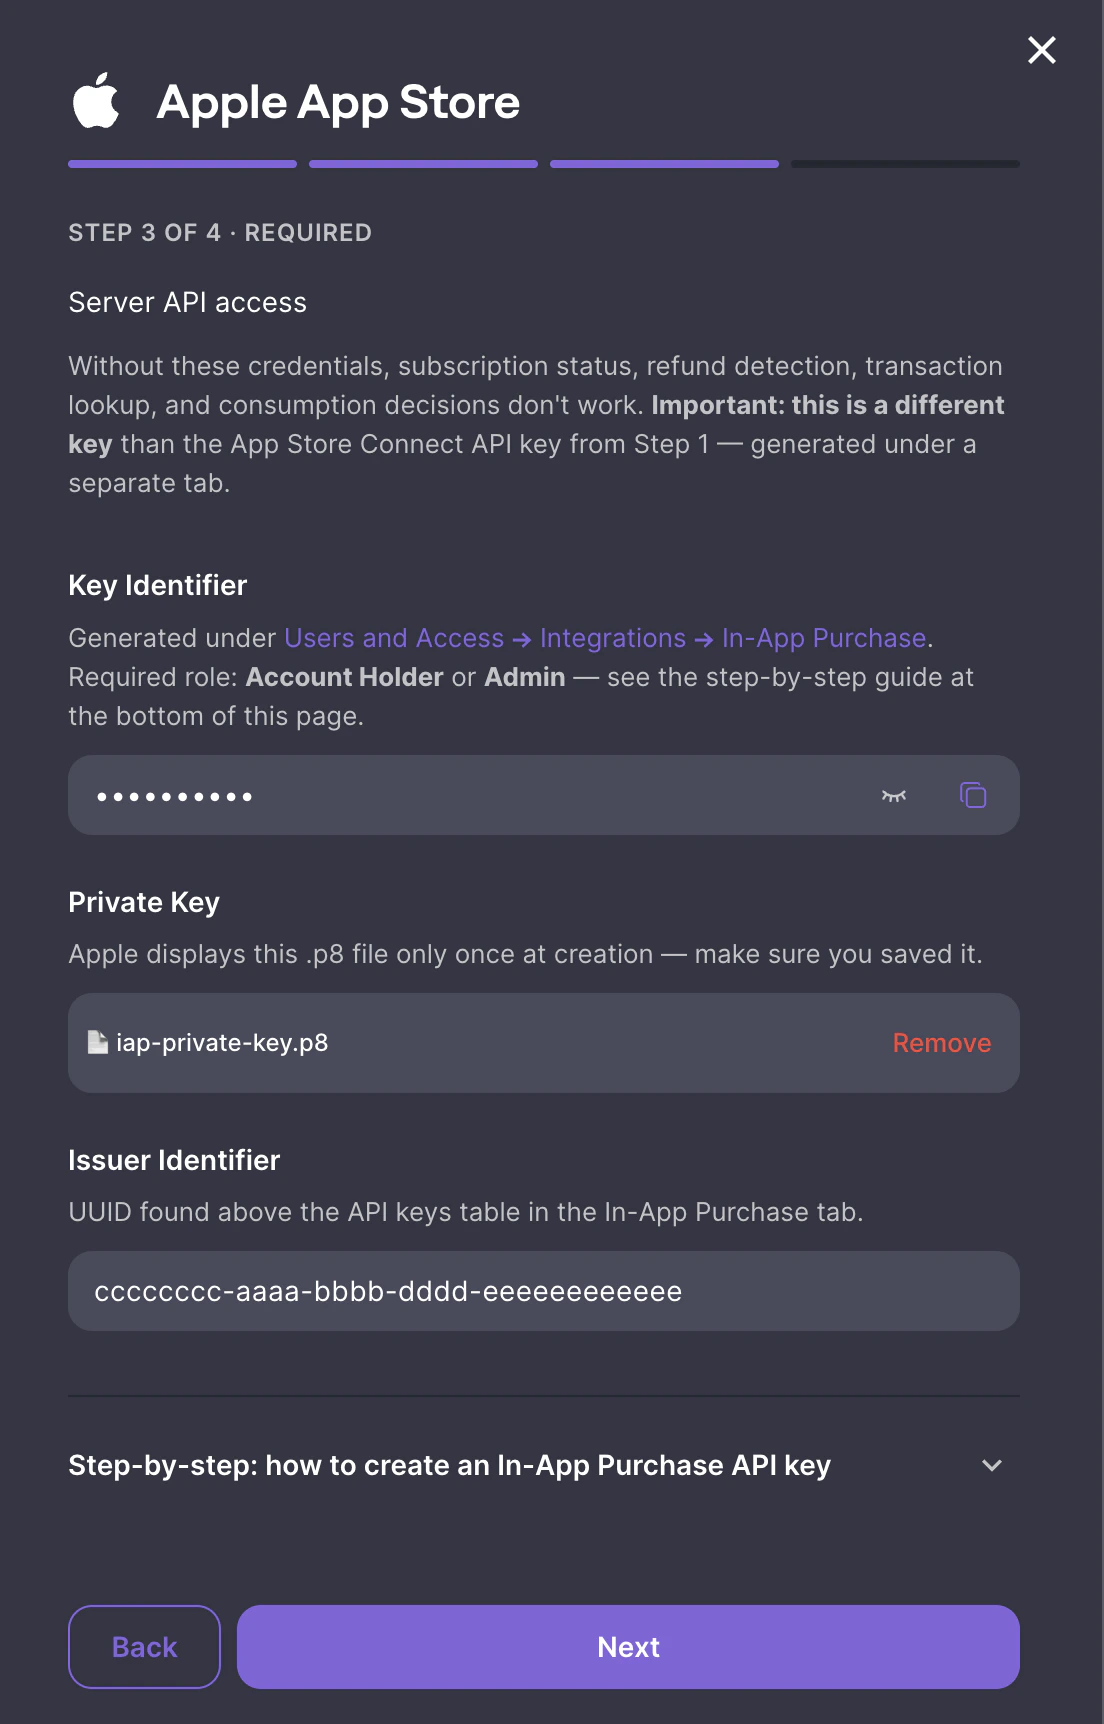
 ## 5. Paste everything into Qonversion
1. Open Qonversion Dash → **Project Settings** → **Stores** → **Apple App Store**.
2. On **Step 3 · Server API access**:
* Paste the **Key ID** in the **Key Identifier** field.
* Upload the `.p8` file in the **Private Key** field.
* Paste the **Issuer ID** in the **Issuer Identifier** field.
## 5. Paste everything into Qonversion
1. Open Qonversion Dash → **Project Settings** → **Stores** → **Apple App Store**.
2. On **Step 3 · Server API access**:
* Paste the **Key ID** in the **Key Identifier** field.
* Upload the `.p8` file in the **Private Key** field.
* Paste the **Issuer ID** in the **Issuer Identifier** field.
 ## Troubleshooting
Step 3 has no preflight Verify button — Apple validates the key when Qonversion makes its first runtime call. Issues surface as failed receipt validations, missing refund events, or empty subscription-status responses.
### Receipts or transactions fail validation (HTTP 401 / NOT\_AUTHORIZED)
* Make sure you pasted the **Key ID**, not the key name.
* Make sure the **Issuer ID** is from the **In-App Purchase** tab, not the App Store Connect API tab.
* Make sure the `.p8` file matches the Key ID you pasted.
* If you previously revoked the old key on Apple's side, the old `.p8` stops working immediately — generate a new key, upload the new `.p8`, and Qonversion switches over on the next call.
### Lost the .p8 file
Apple does not let you re-download the file. Open **Users and Access → Integrations → In-App Purchase**, **revoke** the old key, then generate a new one and re-upload the new `.p8`.
***
## What's next?
After this step, finish the rest of the wizard:
* **Step 4 · Production readiness** — copy the [Server-to-Server Notification URL](ios-s2s-notifications) into App Store Connect.
## Troubleshooting
Step 3 has no preflight Verify button — Apple validates the key when Qonversion makes its first runtime call. Issues surface as failed receipt validations, missing refund events, or empty subscription-status responses.
### Receipts or transactions fail validation (HTTP 401 / NOT\_AUTHORIZED)
* Make sure you pasted the **Key ID**, not the key name.
* Make sure the **Issuer ID** is from the **In-App Purchase** tab, not the App Store Connect API tab.
* Make sure the `.p8` file matches the Key ID you pasted.
* If you previously revoked the old key on Apple's side, the old `.p8` stops working immediately — generate a new key, upload the new `.p8`, and Qonversion switches over on the next call.
### Lost the .p8 file
Apple does not let you re-download the file. Open **Users and Access → Integrations → In-App Purchase**, **revoke** the old key, then generate a new one and re-upload the new `.p8`.
***
## What's next?
After this step, finish the rest of the wizard:
* **Step 4 · Production readiness** — copy the [Server-to-Server Notification URL](ios-s2s-notifications) into App Store Connect.