> ## Documentation Index
> Fetch the complete documentation index at: https://documentation.qonversion.io/llms.txt
> Use this file to discover all available pages before exploring further.
# Set up Google Play for Qonversion
> How to create a Google Play service account, grant Qonversion access to the Google Play Developer API, and connect Real-Time Developer Notifications — the prerequisites for processing Android purchases through Qonversion.
Qonversion needs two things from your Google Play account: a **service account** with permission to read your app's billing data, and a Pub/Sub topic for **Real-Time Developer Notifications (RTDN)**. The wizard surfaces both as a single step; this guide walks through generating each piece on the Google side before pasting them in.
The flow spans two consoles — **Google Cloud Console** (sections 1–5) and **Google Play Console** (section 6) — and ends back in **Qonversion Dash** (section 7). Keep both Google tabs open; you'll switch between them.
## 1. Open the Google Cloud Console
1. Sign in to the [Google Cloud Console](https://console.cloud.google.com/welcome).
2. Pick the Google Cloud project that owns your app from the project picker at the top (or create one).
3. From **Quick access** on the welcome page, open **APIs & Services** — this is where you enable the integrations Qonversion needs.
 Use a project that's dedicated to this app (or shared across your apps). The service account you create later inherits this project's identity, so keep things tidy.
## 2. Enable the required Google APIs
Three Google APIs need to be enabled on the same Cloud project:
* **Google Play Android Developer API** — lets Qonversion validate purchases and read subscription state.
* **Google Play Developer Reporting API** — surfaces RTDN delivery health in the Qonversion settings card.
* **Cloud Pub/Sub API** — required to provision the Real-Time Developer Notifications topic.
### 2.1 Open the API Library
In **APIs & Services**, click **Library** in the left sidebar.
Use a project that's dedicated to this app (or shared across your apps). The service account you create later inherits this project's identity, so keep things tidy.
## 2. Enable the required Google APIs
Three Google APIs need to be enabled on the same Cloud project:
* **Google Play Android Developer API** — lets Qonversion validate purchases and read subscription state.
* **Google Play Developer Reporting API** — surfaces RTDN delivery health in the Qonversion settings card.
* **Cloud Pub/Sub API** — required to provision the Real-Time Developer Notifications topic.
### 2.1 Open the API Library
In **APIs & Services**, click **Library** in the left sidebar.
 ### 2.2 Find each API
Search by name (e.g. `Google Play Android Developer API`) and open the matching result. Repeat for the other two APIs.
### 2.2 Find each API
Search by name (e.g. `Google Play Android Developer API`) and open the matching result. Repeat for the other two APIs.
 ### 2.3 Enable each API
On every Product details page, click **Enable**. You'll repeat this for all three APIs.
### 2.3 Enable each API
On every Product details page, click **Enable**. You'll repeat this for all three APIs.
 ## 3. Create a service account
The service account is the identity Qonversion uses to call Google APIs on your behalf.
### 3.1 Open IAM & Admin
Return to the Cloud Console home (or use the search bar) and open **IAM & Admin** from **Quick access**.
## 3. Create a service account
The service account is the identity Qonversion uses to call Google APIs on your behalf.
### 3.1 Open IAM & Admin
Return to the Cloud Console home (or use the search bar) and open **IAM & Admin** from **Quick access**.
 ### 3.2 Start the service account form
In the left sidebar, click **Service Accounts**, then **+ Create service account** at the top.
### 3.2 Start the service account form
In the left sidebar, click **Service Accounts**, then **+ Create service account** at the top.
 ### 3.3 Name the service account
Give it a clear name like `Qonversion`. The Service account ID auto-fills from the name. Click **Create and continue** to move on.
### 3.3 Name the service account
Give it a clear name like `Qonversion`. The Service account ID auto-fills from the name. Click **Create and continue** to move on.
 ### 3.4 Grant the required roles
In the **Permissions** step, add two roles, then click **Done**:
* **Pub/Sub Admin** — required to provision and manage the RTDN topic.
* **Monitoring Viewer** — lets Qonversion surface RTDN delivery health on the settings card.
### 3.4 Grant the required roles
In the **Permissions** step, add two roles, then click **Done**:
* **Pub/Sub Admin** — required to provision and manage the RTDN topic.
* **Monitoring Viewer** — lets Qonversion surface RTDN delivery health on the settings card.
 ## 4. Generate a JSON key
The JSON key is the credential Qonversion stores to authenticate as your service account.
### 4.1 Open the Keys tab and add a key
Open the service account you just created, switch to the **Keys** tab, click **Add key**, then **Create new key**.
## 4. Generate a JSON key
The JSON key is the credential Qonversion stores to authenticate as your service account.
### 4.1 Open the Keys tab and add a key
Open the service account you just created, switch to the **Keys** tab, click **Add key**, then **Create new key**.
 ### 4.2 Choose JSON and create
Pick **JSON** (the recommended format) and click **Create**. The browser downloads the key file — save it somewhere safe.
### 4.2 Choose JSON and create
Pick **JSON** (the recommended format) and click **Create**. The browser downloads the key file — save it somewhere safe.
 The key file is downloadable only at creation time. If you lose it, delete the existing key from the Keys tab and generate a new one — the previous one stops working as soon as you revoke it.
## 5. Copy the service account's email
You'll need this email in a moment to invite the service account into Google Play Console.
In the **Service Accounts** list, click the email address (or its copy icon) — it looks like `@.iam.gserviceaccount.com`.
The key file is downloadable only at creation time. If you lose it, delete the existing key from the Keys tab and generate a new one — the previous one stops working as soon as you revoke it.
## 5. Copy the service account's email
You'll need this email in a moment to invite the service account into Google Play Console.
In the **Service Accounts** list, click the email address (or its copy icon) — it looks like `@.iam.gserviceaccount.com`.
 ## 6. Grant the service account access in Google Play Console
The service account exists in Google Cloud, but Google Play Console manages permissions separately — you need to invite it there too.
### 6.1 Open Users and permissions
In [Google Play Console](https://play.google.com/console), open **Users and permissions** from the left sidebar and click **Invite new users**.
## 6. Grant the service account access in Google Play Console
The service account exists in Google Cloud, but Google Play Console manages permissions separately — you need to invite it there too.
### 6.1 Open Users and permissions
In [Google Play Console](https://play.google.com/console), open **Users and permissions** from the left sidebar and click **Invite new users**.
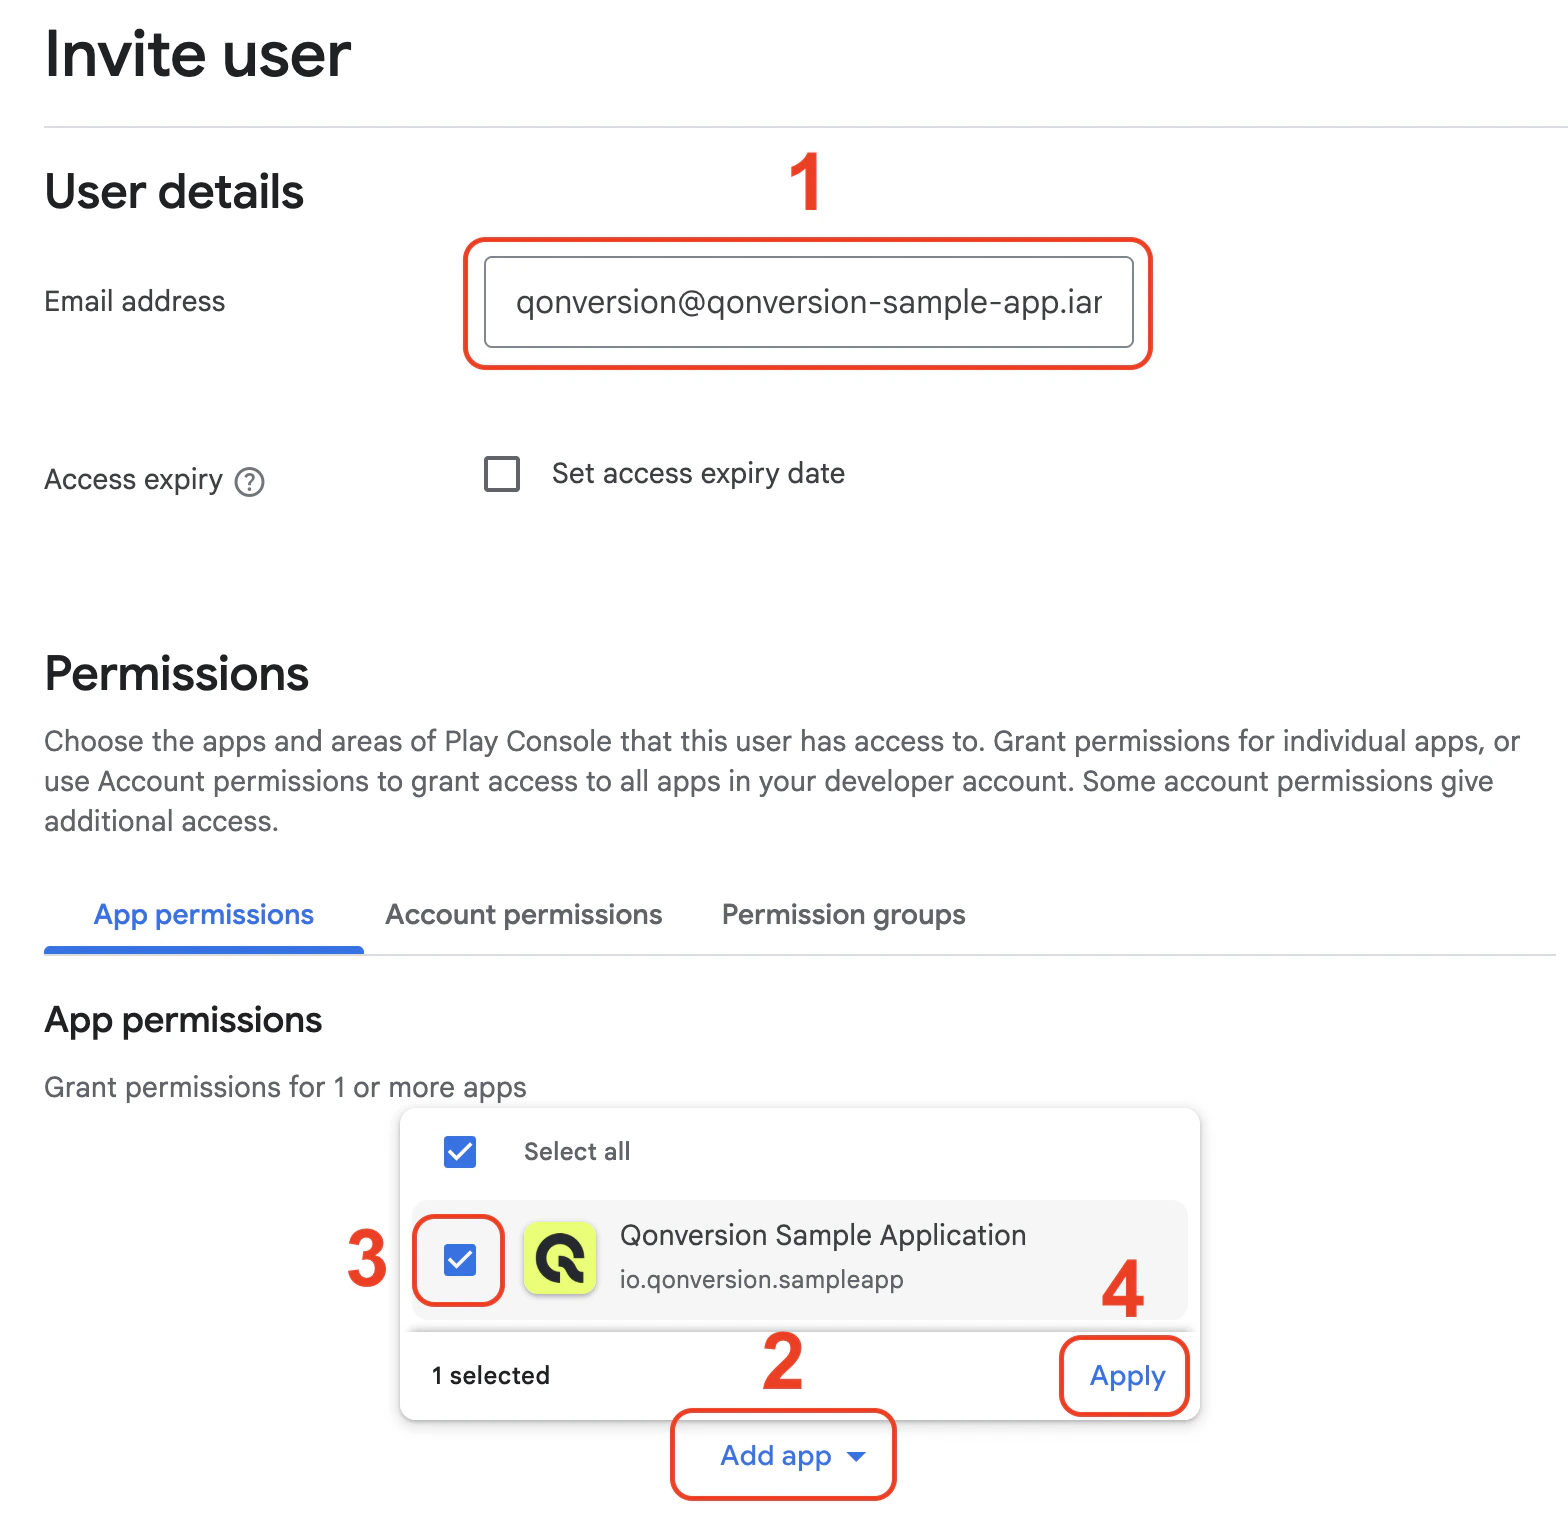
 ### 6.2 Paste the email and add your app under App permissions
Paste the service account email you copied in section 5 into **Email address**, then open the **App permissions** tab and add the app you're configuring.
### 6.2 Paste the email and add your app under App permissions
Paste the service account email you copied in section 5 into **Email address**, then open the **App permissions** tab and add the app you're configuring.
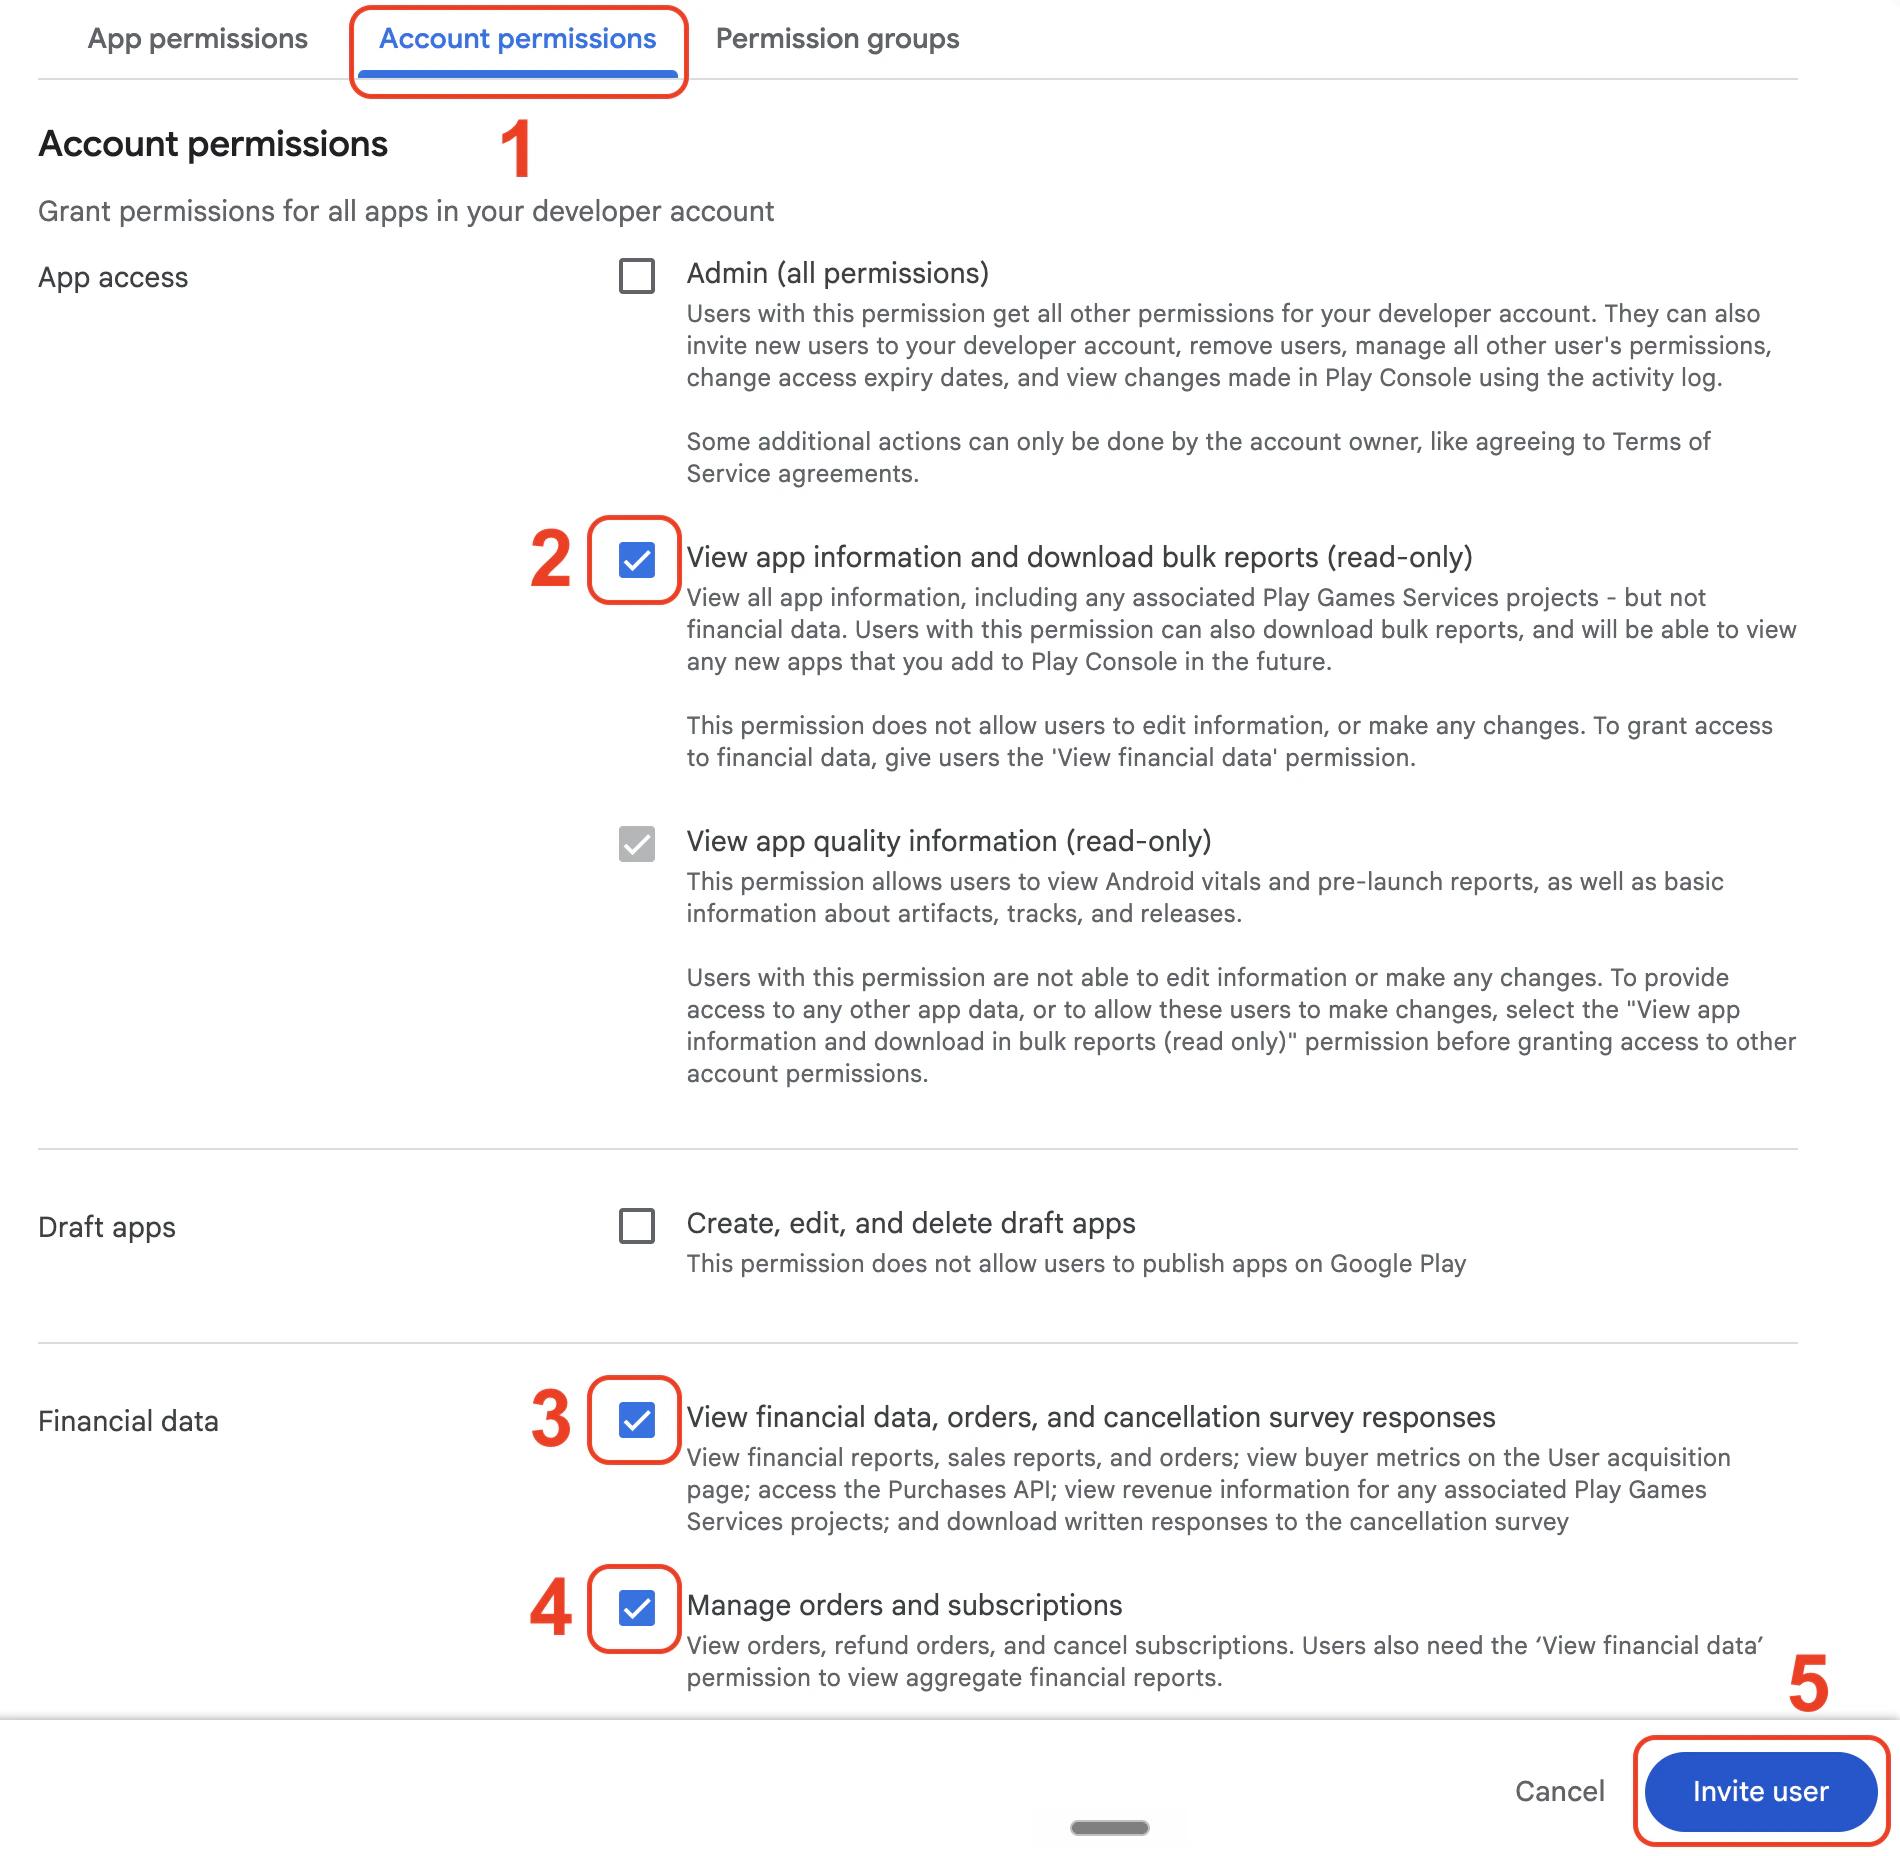
 ### 6.3 Switch to Account permissions and grant access
Open the **Account permissions** tab, tick these three checkboxes, then click **Invite user**:
1. **View app information and download bulk reports (read-only)**
2. **View financial data, orders, and cancellation survey responses**
3. **Manage orders and subscriptions**
### 6.3 Switch to Account permissions and grant access
Open the **Account permissions** tab, tick these three checkboxes, then click **Invite user**:
1. **View app information and download bulk reports (read-only)**
2. **View financial data, orders, and cancellation survey responses**
3. **Manage orders and subscriptions**
 It can take up to 24 hours for Google's API to recognize new service-account permissions. If Qonversion shows "Please provide valid JSON credentials" right after pasting the key, give it a few hours and retry.
## 7. Paste everything into Qonversion
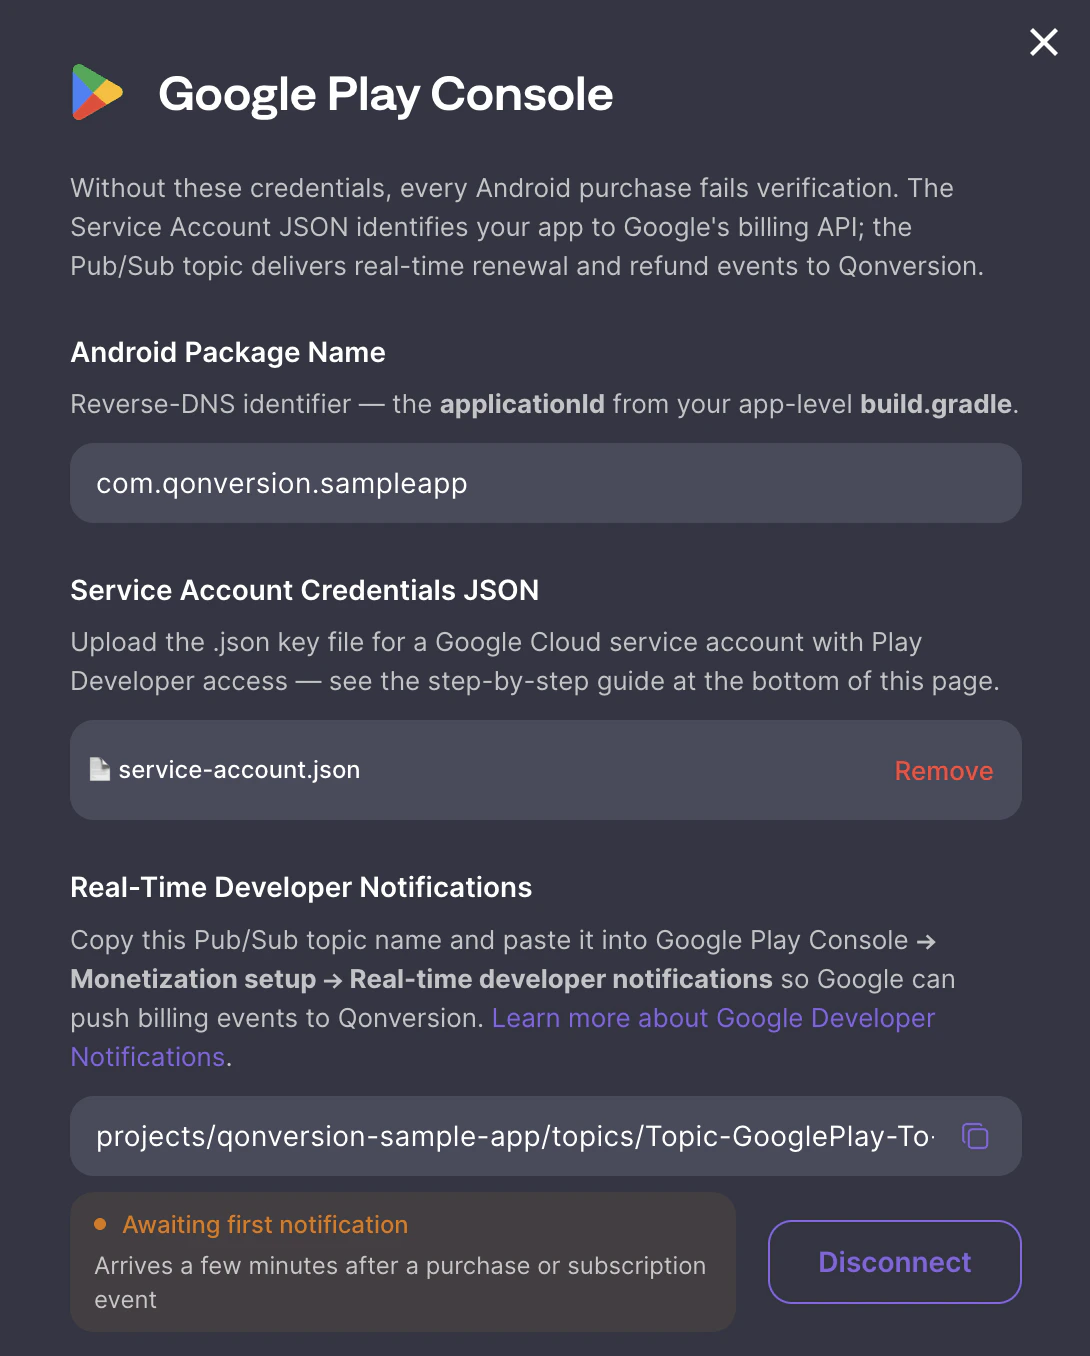
Now jump back to **Qonversion Dash → Project Settings → Stores → Google Play Console**.
1. Paste your **Android Package Name**. This is the same value as `applicationId` in your app-level `build.gradle` — and the identifier Google Play Console lists against each app on the **Home** screen of your developer account.
It can take up to 24 hours for Google's API to recognize new service-account permissions. If Qonversion shows "Please provide valid JSON credentials" right after pasting the key, give it a few hours and retry.
## 7. Paste everything into Qonversion
Now jump back to **Qonversion Dash → Project Settings → Stores → Google Play Console**.
1. Paste your **Android Package Name**. This is the same value as `applicationId` in your app-level `build.gradle` — and the identifier Google Play Console lists against each app on the **Home** screen of your developer account.
 2. Upload the `.json` key file you downloaded in section 4.
3. Click **Connect to Google** to provision the RTDN Pub/Sub topic. Qonversion shows the topic name in the same row — copy it and paste it in Google Play Console → **Monetization setup → Real-time developer notifications**. See [Google Developer Notifications](google-developer-notifications) for the Play Console step.
4. Click **Save**.
2. Upload the `.json` key file you downloaded in section 4.
3. Click **Connect to Google** to provision the RTDN Pub/Sub topic. Qonversion shows the topic name in the same row — copy it and paste it in Google Play Console → **Monetization setup → Real-time developer notifications**. See [Google Developer Notifications](google-developer-notifications) for the Play Console step.
4. Click **Save**.
 ## Troubleshooting
### "Please provide valid JSON credentials"
* Wait up to 24 hours after granting Play Console access — propagation is slow.
* Make sure the service account is invited in **both** Google Cloud (as a service account) **and** Google Play Console (as a user with the three required Account permissions plus the app under App permissions).
* Confirm the JSON file's `client_email` matches the service-account email you invited.
### "The current user has insufficient permissions"
If you created your in-app products before granting the service account access, Google Play sometimes caches the old permission set. Open any in-app product on the Google Play Console, edit it lightly (e.g. tweak the description) and save — that nudges the cache.
### RTDN tag stays "Awaiting first notification" after a few minutes
* Trigger a sandbox subscription event (renewal, refund) — Google only sends notifications for actual events.
* Make sure **Pub/Sub Admin** is set on the service account; without it, Google can't publish to the topic.
* Check that **Cloud Pub/Sub API** is enabled in the same Google Cloud project.
### Lost the .json key
The Service Accounts → Keys tab lets you delete the old key and generate a new one. Re-upload the new file in the wizard — Qonversion will overwrite the stored credentials.
***
## What's next?
After this step, your Android configuration is complete. Test end-to-end:
* Make a sandbox purchase from a test device and confirm it appears in Qonversion within seconds.
* Trigger a refund or cancellation in Play Console and confirm the event arrives.
## Troubleshooting
### "Please provide valid JSON credentials"
* Wait up to 24 hours after granting Play Console access — propagation is slow.
* Make sure the service account is invited in **both** Google Cloud (as a service account) **and** Google Play Console (as a user with the three required Account permissions plus the app under App permissions).
* Confirm the JSON file's `client_email` matches the service-account email you invited.
### "The current user has insufficient permissions"
If you created your in-app products before granting the service account access, Google Play sometimes caches the old permission set. Open any in-app product on the Google Play Console, edit it lightly (e.g. tweak the description) and save — that nudges the cache.
### RTDN tag stays "Awaiting first notification" after a few minutes
* Trigger a sandbox subscription event (renewal, refund) — Google only sends notifications for actual events.
* Make sure **Pub/Sub Admin** is set on the service account; without it, Google can't publish to the topic.
* Check that **Cloud Pub/Sub API** is enabled in the same Google Cloud project.
### Lost the .json key
The Service Accounts → Keys tab lets you delete the old key and generate a new one. Re-upload the new file in the wizard — Qonversion will overwrite the stored credentials.
***
## What's next?
After this step, your Android configuration is complete. Test end-to-end:
* Make a sandbox purchase from a test device and confirm it appears in Qonversion within seconds.
* Trigger a refund or cancellation in Play Console and confirm the event arrives.